Tag: Mycology

  • Hügelkultur in Pennsylvania

    Hügelkultur in Pennsylvania

    Hügelkultur in Pennsylvania: Nature’s Raised Bed

    Years ago, hurricane Sandy turned my forested property into an open meadow with massive rotting tree stumps everywhere.  The trees on my property that used to provide shade and beauty, now produced a steady supply of fallen branches, logs, and leaves.  Since I had already been slowly ‘rewilding’ my lawn area, it seemed only natural to consider a gardening technique that turned this “debris” into a gold mine of fertility: Hügelkultur.

    What is Hügelkultur?

    Hügelkultur, pronounced “hoo-gul-kultur,” translates to “mound culture” or “hill culture.” It’s a centuries-old gardening method that involves creating raised garden beds by mounding logs, branches, leaves, compost, and soil. Think of it as a lasagna garden, but with a woody base layer. This base layer is the key to Hügelkultur’s many benefits.

    Why Hügelkultur is a Win-Win for Your Garden

    Hügelkultur provides many benefits.  As long as you have the ingredients on hand, the only real drawback I can think of is that many people don’t like the way the mounds look.  I’ll assume that this isn’t an issue for you and just dive right into why Hügelkultur is a win-win for your garden.

    1. Waste Reduction and Recycling: Hügelkultur is an excellent way to repurpose organic materials that would otherwise end up in a landfill or burn pile. You’re essentially recycling your yard waste into rich, fertile soil.  This is also way to reuse the spent substrate from my mycology hobby.

    2. Improved Soil Structure: The decomposing wood acts like a sponge, absorbing water and releasing it slowly to plants. This makes Hügelkultur beds incredibly drought-resistant and perfect for our sometimes unpredictable Pennsylvania weather.

    3. Increased Fertility: As the wood breaks down, it creates a nutrient-rich environment for plants. This slow-release fertilizer eliminates the need for synthetic inputs, leading to healthier and more productive gardens.

    4. Warm Beds: The decomposition process generates heat, creating a microclimate that can extend your growing season. This is especially beneficial in Southeastern PA, where our spring and fall seasons can be fickle.

    5. Habitat for Beneficial Organisms: The complex environment of a Hügelkultur bed provides shelter and food for a wide range of beneficial organisms, from earthworms to microbes. These creatures contribute to the overall health of your soil and garden.

    Hügelkultur in Pennsylvania

    Southeastern Pennsylvania is uniquely suited to Hügelkultur for several reasons:

    • Abundance of Woody Material: The deciduous forests of southeastern PA provide ample materials for building Hügelkultur beds. Oak, maple, hickory, and other hardwood species are excellent choices for the base layer.

    • Climate: Our moderate temperatures and ample rainfall provide ideal conditions for the decomposition process within the bed.

    • Soil Types: While our soils vary, Hügelkultur can be adapted to most conditions. In heavier clay soils, the mounded structure improves drainage. In sandier soils, the woody material helps retain moisture.

    Building Your Hügelkultur Bed

    Here’s a simplified guide to getting started:

    1. Choose a Location: Select a sunny or partially shaded spot with good drainage.

    2. Create a Base: Lay down logs and branches, the larger the better. Cover with smaller branches, twigs, and leaves.

    3. Add Layers: Layer on compost, manure, and topsoil, building a mound.

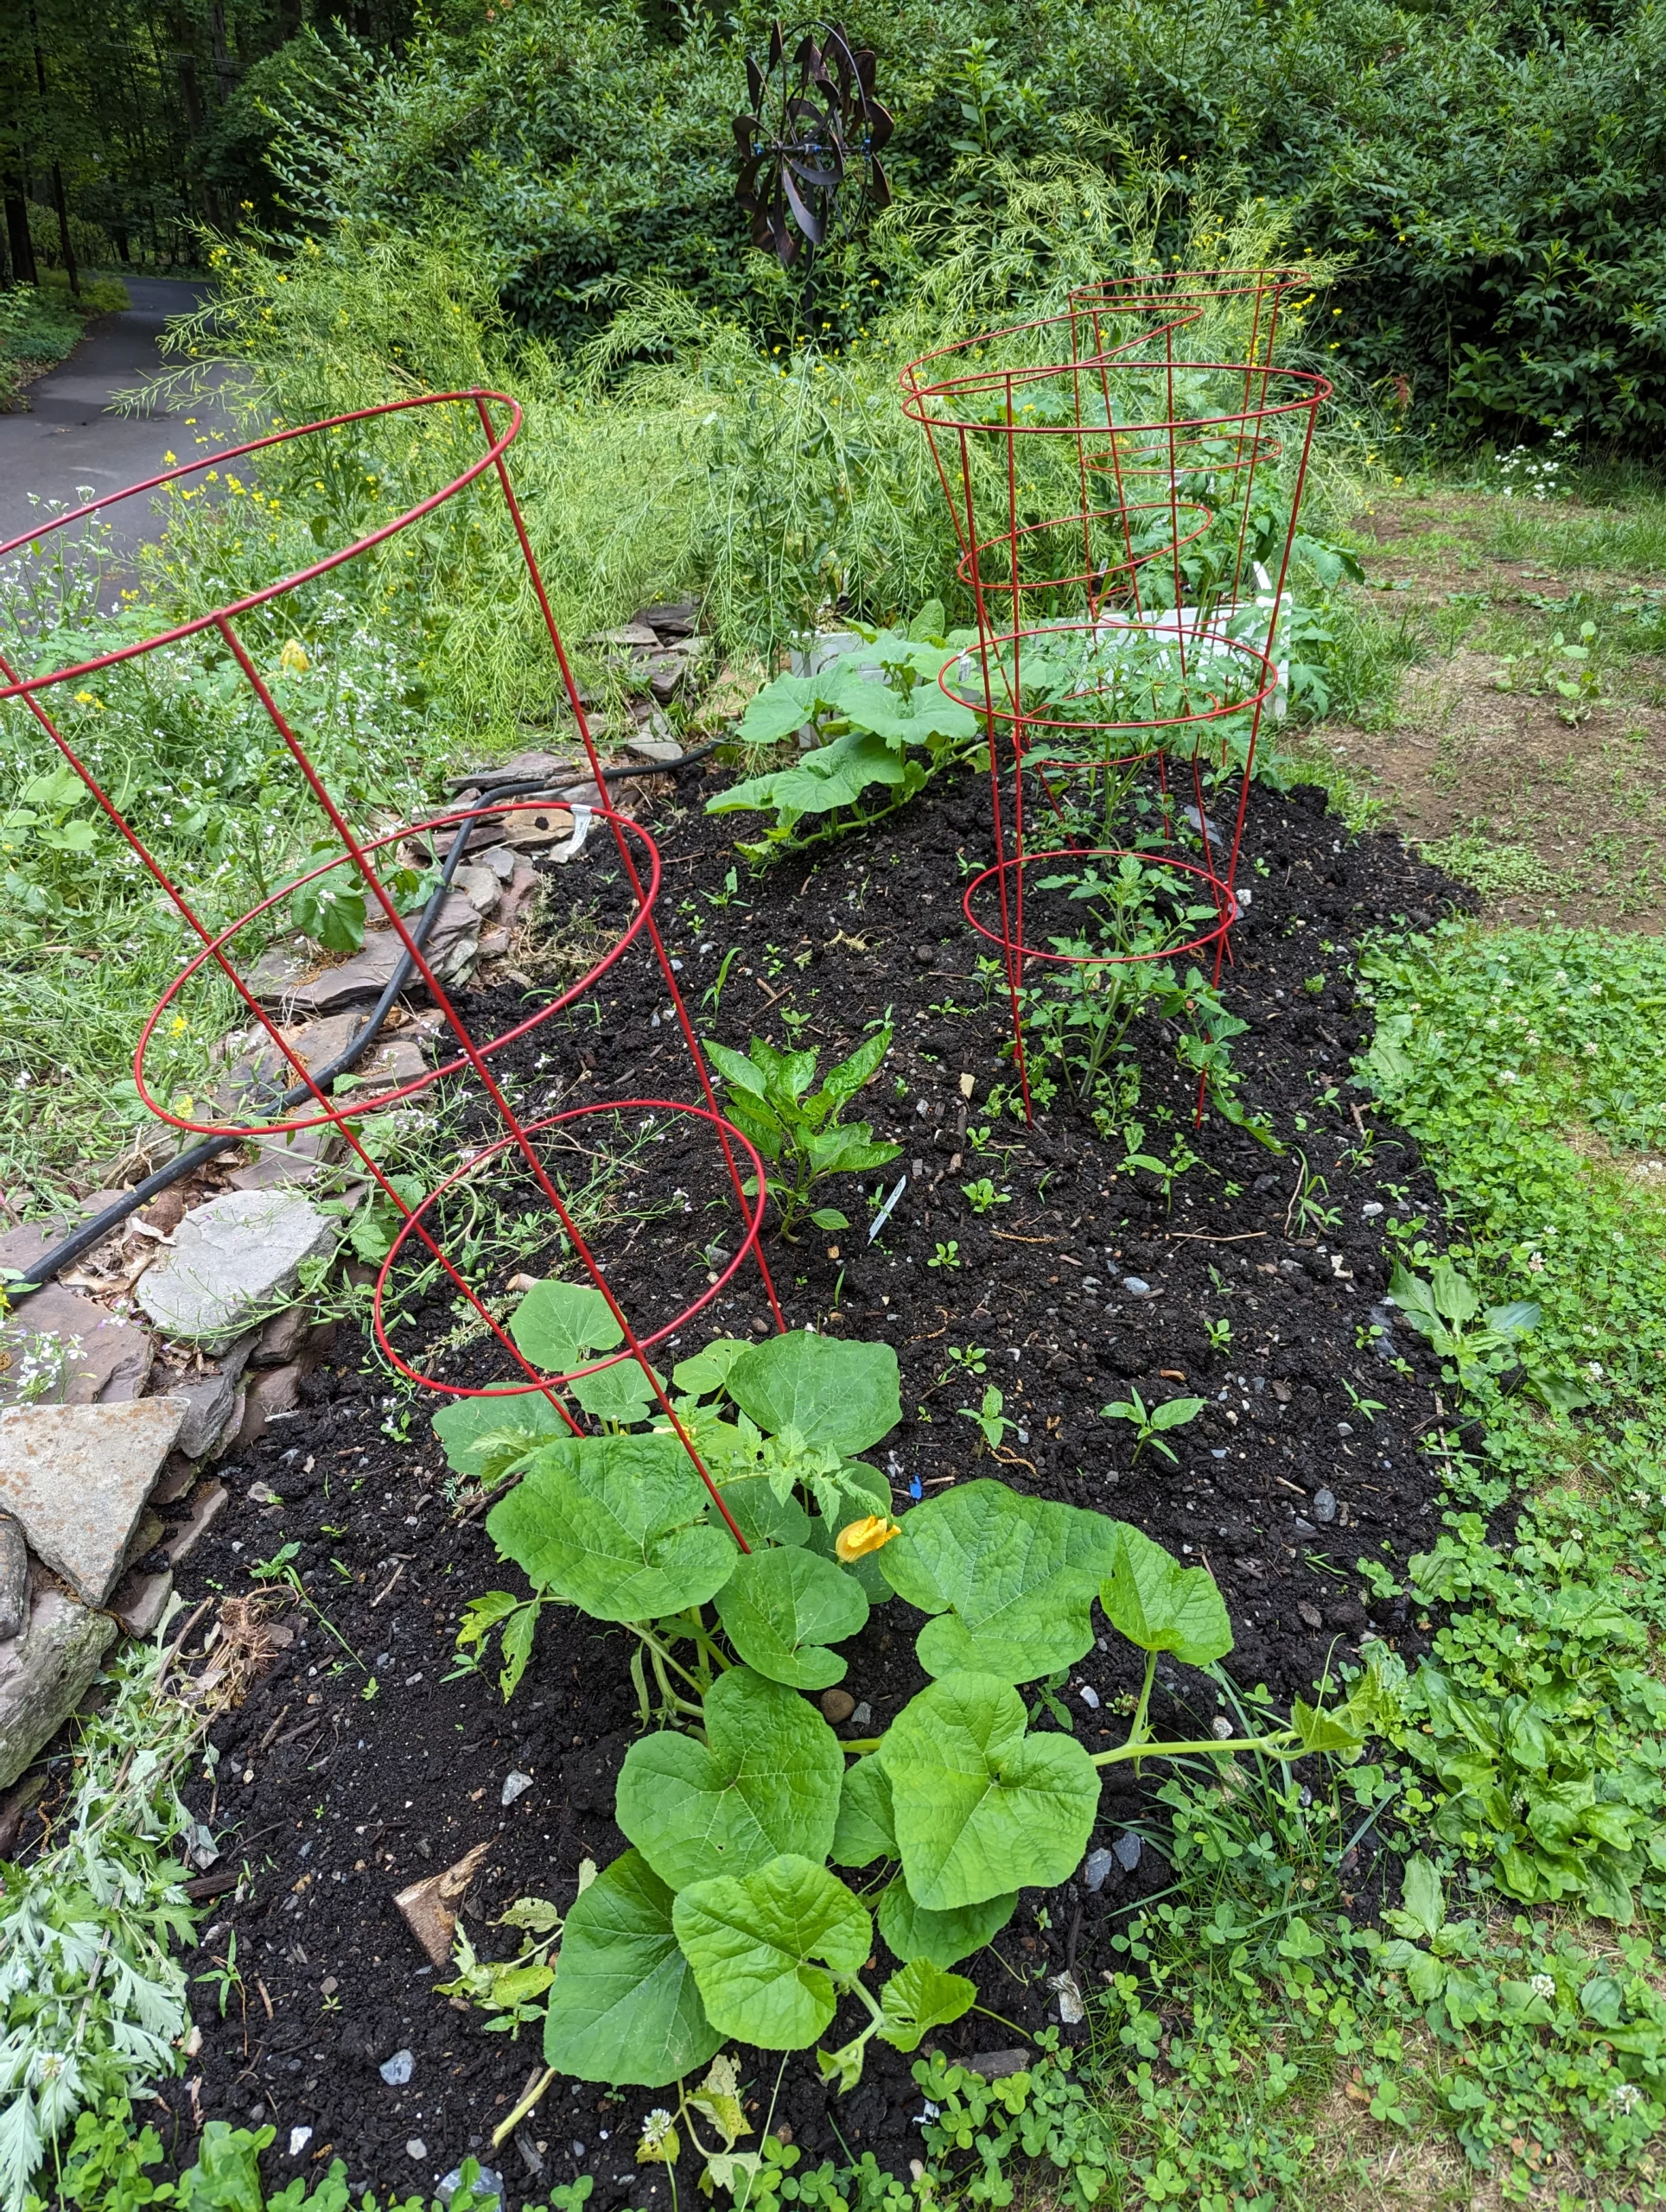
    4. Plant: Hügelkultur beds are ideal for a wide variety of plants, from vegetables and herbs to perennials and shrubs. Experiment to see what thrives in your mound.

    Important Considerations:

    • Wood Choice: Avoid using black walnut, as it contains juglone, a chemical that can inhibit the growth of some plants. Treated lumber should also be avoided due to potential chemical leaching. Stick to untreated hardwood like oak, maple, or hickory for the best results.

    • Patience: The decomposition process in a Hügelkultur bed takes time. The full benefits, like improved soil structure and nutrient release, may not be realized for a few years. Be patient, and enjoy the journey as your mound matures.

    • Maintenance: While Hügelkultur beds are relatively low-maintenance, they do require some attention. Monitor moisture levels, especially in the first few years, as the woody material absorbs water. Top dress with compost or mulch annually to replenish nutrients.  This is a great place to dump the soil from your container garden when the season is over.

    • Plant Selection: Choose plants that thrive in well-drained soil and can tolerate the heat generated by the decomposing wood. Some good options for southeastern PA include tomatoes, peppers, squash, beans, herbs, and perennials like lavender and coneflower.

    • Scale: Start small if you’re new to Hügelkultur. A smaller bed is easier to manage and allows you to experiment with different materials and techniques. As you gain experience, you can expand or create additional beds.

    Your Journey to Hügelkultur in Pennsylvania (and everywhere!)

    Hügelkultur is an exciting way to transform your landscape and gardening practices. It is more than just a gardening technique; it’s a philosophy of working with nature to create a sustainable and abundant garden.  By embracing this ancient technique, you’re not only creating a fertile oasis for plants but also contributing to leading a more eco-conscious way of life.

    If you’re ready to embark on your Hügelkultur journey, I encourage you to take the first step. Experiment, learn, and adapt this method to your specific needs and environment. And remember, you’re not alone!

    I’d love to hear about your Hügelkultur experiences, successes, and challenges. Feel free to share your questions, photos, or insights in the comments below. Together, we can create a thriving community of Hügelkultur enthusiasts in Southeastern Pennsylvania!

  • Warming My Mycology Grow Room

    Warming My Mycology Grow Room

    In the last issue of Fermenting Solutions, I mentioned that trying to keep my mycology grow room warm was becoming an issue.  Each month, the arrival of my electric bills was starting to induce sticker shock.  When I decided to have a year round mushroom growing setup it was only natural to put it in the warmest room in my house.  My indoor gardening setup was already there.  So why not add mushrooms? The increase in costs to maintain the temperature was making it obvious that this wasn’t going to work all year round.  What could I do to make warming a mycology grow room easier?

    Warming My Mycology Grow Room

    This area of my house just happens to be the laundry room and I initially choose it because it is where my hot water heater and furnace were already located.  Even so, during winter, this room tends to still be almost 10 degrees too cold for the most demanding varieties of mushrooms that I enjoy growing.  Up until this point, I was basically just using an electric radiant heater to supplement the heat.

    Mushrooms also demand a high humidity environment.  Even though this was also the most humid room in the house, the climate conditions aren’t perfect in this regard either.  I kept a humidifier running constantly in this room as well.  Ultimately, this resulted in a lot of wasted electricity.  I didn’t have fine grained control based on feedback in the room.  The heater and humidifier often battled each other, requiring both devices to work harder.  Having been down the path of automating my gardening setup already, every day that went by watching this battle just continued to annoy me.  The increasing electric bills were just icing on the cake.

    Making Space

    The first major problem was that all of the closets/nooks and crannies in the rooms were already preoccupied by my indoor garden.  I wanted the ability to have mushroom grows and plants going at the same time and not be forced to stop one hobby during a prime time for the other.  Reusing the existing space was not an option.  I also wanted to minimize the area that I need to heat and humidify.  This would allow me to maintain several different ‘climates’ in this room while minimizing the energy that went into doing so.  I had an inexpensive 5 shelf plastic green house lying around that I used to use for my gardening setup and decided to try using that as the foundation for creating my mycology microclimate.

    Containing the Humidity

    This green house had no bottom and I wanted to protect the floor of the laundry room.  I found a hard plastic tray that is used for performing oil changes.  This just so happened to be the perfect size to snugly fit the base of the green house.  To add additional protection, I wrapped the entire bottom of the tray and greenhouse in a standard camping tarp.  I wasn’t sure how effective all of this was going to be for holding in the humidity and temperature and not continuing to just control the climate of the entire room as before.

    Raising the Temperature

    The idea of putting an electric radiant heater inside of this humid greenhouse didn’t seem like the best idea, so I started investigating alternate ways of providing heat.  After doing a ton of research online, I opted to build a contraption that used a ceramic infrared heating unit to heat a tray full of water and lava rocks.  My thinking was, that if the greenhouse was effective at holding the heat, this should result in less electricity use without decreasing the humidity the way my prior heater did.  I had a spare temperature controller so I used this to turn this contraption on/off based on the actual temperature in the middle of the green house.

    Automating Humidity

    At this point, I just put my existing humidifier inside the green house and put it on a timer.  I hoped that it would more or less keep things around 90% humidity for most of the day.  I started monitoring this with a hygrometer that displayed the current humidity and stored the past 24 hour high and low.  Checking it frequently over the course of a few days, I determined that it was holding heat better than I expected and subjectively, it seemed that the heater was running less frequently than the whole room one had in the past.  The room also didn’t feel like a sauna every time I walked in to check on my garden.  Things were starting to look promising.

    Fixing Some Obvious Annoyances

    After a few days, refilling the humidifier inside the green house started to become a painful chore.  It was also clear that having it on a timer would definitely lead to swings in humidity.  Since I was investing so much time into this, I decided to find a different solution.  I thought about putting the humidifier outside the green house, but the thought of creating a tubing solution to getting the humidity inside didn’t seem like a good investment of time.  First I ordered a combined temperature/humidity controller to replace the timer I was using to control the humidifier and the original temperature controller.  I also knew through my research that many others were using pond foggers instead of humidifiers.  This had the added benefit that if I combined it with an aerator, I could also pump fresh air into the green house.

    Not everyone is aware that mushrooms need to take in oxygen and produce Carbone Dioxide just like animals do.  This was an eventual issue I was going to need to deal with any way.  I put an aerator outside and ran tubing from it into a large honey jar filled with water.  This jar also contained the pond fogger.  The jar was still inside the green house, but I discovered that when I needed to refill it, I could just remove the aerator and pump water into the jar using the same tubing.  Brilliant!  I ran another tube out the top of the jar.  The aerator/fogger combined pushes the fog through that tube to the top of the green house.  Currently the aerator runs 24/7 and the fogger is controlled by the humidity controller.

    Testing Everything Out

    I tested fruiting some mushrooms at this point.  Even though I didn’t have a means of measuring the CO2 levels directly.  My gut felt that they were a bit high based on the outcome.  I finally added a small USB fan in the bottom of the greenhouse to move air around more.  Additionally, I punctured a few holes in the greenhouse that I covered with microfilters in order to allow a bit more free air exchange.  I’m currently waiting for the results of the next fruiting (and for my next electric bill)!

    Future Iterations

    Anyone else gone down this path?  I’m curious what solutions worked for you.  I plan on iterating on this plan and over time will upgrade and swap out equipment based on future experiments.  Some ideas:  More precise control over temperature/humidity in different areas within the greenhouse.  I’d like to have the ability to fruit and grow multiple species using optimal conditions at once.  Same with being able to produce agar and liquid cultures.  I’m also curious to see how all of this works out during the next winter.  I have ideas for how I can better insulate and isolate this environment from the surrounding room.  Time will tell if I need to alter my approach.


  • Fermenting Solutions

    My email newsletter is entitled Fermenting Solutions. It started years ago as an effort to ‘dog food’ AWeber’s Curate mobile app. It’s a semi regular chronicle of a current project that I’m spending time on… the trials, tribulations and the interesting beverages I’ve had to drink while trying to work through them. You can read past issues here. If you’re interested in getting all new issues in your inbox, you can sign up using the form below.