Tag: Automation

  • How to Be Productive

    How to Be Productive

    In today’s fast-paced world, being productive is crucial for achieving success in both personal and professional life. With numerous tasks competing for our attention, it’s easy to get bogged down and lose focus. However, by implementing a few simple yet effective strategies, you can significantly boost your productivity and accomplish more in less time.

    How to Be Productive: Strategies for Achieving More in Less Time

    Set Clear Goals

    The first step towards increasing productivity is to set clear and specific goals. What do you want to achieve? What are your priorities? I used to use SMART (specific, measurable, achievable, relevant, and time-bound) goals for this.  I’ve since moved to using OKRs.  I find OKRs simpler because they really just consist of two things: an Objective and Key Results.  The Objective is why you’re doing the task in the first place.  Key Results are how you plan to measure that your Objective is being met.

    No matter how you decide to define your goals, you will likely need to break them down into smaller, manageable tasks. This will help you stay focused and directed, ensuring that you’re making progress towards your goals.

    Create a Schedule

    A well-planned schedule is essential for maximizing productivity. Allocate specific time slots for each task, taking into account your energy levels and concentration. Be realistic about how long each task will take, and leave some buffer time for unexpected interruptions. Use a system to stay organized and on track.

    Prioritize Tasks

    Not all tasks are created equal. Identify the most critical tasks that align with your goals and tackle them first. At a minimum, use the Eisenhower Matrix to categorize tasks into:

    • Urgent and important (Do first)
    • Important but not urgent (Schedule)
    • Urgent but not important (Delegate, if Possible)
    • Not urgent or important (Eliminate)

    Minimize Distractions

    Distractions are a major productivity killer. Identify common distractions such as social media, email notifications, or chatty coworkers, and avoid them while you work.

    Implement these strategies to stay on track:

    • Turn off notifications for non-essential apps; Use other ‘Do Not Disturb’ settings.
    • Limit social media and email checks.  Use website blockers if your own will power is not strong enough.
    • Create a quiet, comfortable workspace
    • Schedule breaks to recharge and avoid burnout

    Use the Pomodoro Technique

    Personally, I often use the Pomodoro Technique.  This involves working in focused 25-minute increments, followed by a 5-minute break. After four cycles, take a longer break of 15-30 minutes. This helps you both stay focused and avoid burnout by scheduling regular breaks to recharge.

    Leverage Technology

    Even though technology can be a curse when it comes to productivity, proper use, can be a blessing. Utilize tools like project management software, browser extensions, or mobile apps to streamline tasks, automate repetitive processes, and enhance organization.  You may need to explore various tools to find what works best for you.

    Review and Adjust

    Regularly evaluate your progress toward your goals, adjusting your approach as needed. Celebrate accomplishments and identify areas for improvement.  Create new tasks when discovering gaps in the initial breakdown of the goal.

    Take Care of Yourself

    Finally, don’t forget to take care of your physical and mental well-being. Regular exercise, healthy eating habits, and adequate sleep are essential for maintaining energy levels and cognitive function. Incorporate meditation or practice deep breathing exercises to reduce stress when you’re not in your ‘focused’ time increments.

    Develop a Morning Routine

    Even if you don’t take time for yourself throughout the day, starting it with a positive ritual sets the tone for productivity. Incorporate activities that boost energy and motivation, such as:

    1. Exercise or meditation
    2. Journaling or goal-setting
    3. Reading or learning something new

    My Technique

    My personal productivity technique is highly derived from David Allen’s “Getting Things Done: The Art of Stress-Free Productivity“.  I read this book when it first came out and nothing has been more beneficial to my productivity than what arose out of reading this.  I started a system that was paper based as described in the original book, but quickly developed my own iteration using electronic tools. I’ve morphed this system to different tool chains at least 3 major times, but continue to use the same basic principles with some added enhancements of my own.

    The Five Steps of Getting Things Done

    The Getting Things Done (GTD) methodology is a comprehensive system for managing tasks, projects, and goals. The five core steps of GTD are:

    • Capture: Collect and gather all tasks, ideas, and projects in a centralized system. This can be a notebook, digital tool, or app. The goal is to get everything out of your head and into a trusted system.  Getting things out of your head really minimizes the ‘stress’ of potentially forgetting something.
    • Clarify: Process and organize the captured information into actionable tasks. Break down large projects into smaller, manageable steps. Identify the desired outcome and the next action required to move forward.
    • Organize: Categorize and prioritize tasks based on context, project, and priority. Use lists, tags, and folders to create a structured system that makes sense to you.
    • Reflect: Regularly review and update your system to ensure it remains current and accurate. This step helps you stay on track, adjust priorities, and make informed decisions.
    • Engage: Take action on the tasks and projects outlined in your system. Focus on the next step required to move forward, and trust that your system will guide you through the process.

    How to Be Productive with GTD

    Here is how I implement GTD in my daily life.  Currently I use Trello as my entry point into my ‘Capture’ system.

    Boards

    I have boards setup in Trello for each of the major project areas in my life.  Some examples include: House, Garden and a separate board for each organization that I do work for.  Each board at the bare minimum has buckets for: TODO, In Progress, Done.  Many of the organization boards have additional buckets based on the workflow in that organization.

    Cards

    I have special cards on each board that represent my OKRs.  Every other card is a task that needs to be done.   I use the Google drive and calendar integrations to connect cards to my schedule and to any supporting documentation that I may want to be able to refer to.  When I complete a Card, I’ll move it to the ‘Done’ bucket and archive it.  Archiving it allows me to exclude it from searches and get it out of ‘My Cards’ view without losing all the historical information related to it.

    Checklists

    I use Trello Checklists to relate any task card back to an OKR.  Ideally each of these task cards are small enough and detailed enough to be actionable.  If not, they can be broken down further using additional checklists and the parent card can be designated as a ‘blocker’.   Often if more information is needed, a task card might just be an ‘investigate something further’ card.  At any point in time, the non-DONE cards on a checklist should be organized so that the GTD ‘next action’ is clear.

    Labels

    I use Trello Labels to denote cards that are ‘blockers’.  When this is done, I know that more work needs to be done before I can go onto the next priority  I also use Trello Labels to identify cards that require special equipment (in front of a computer, use of a phone, something that can be done while walking) or to be in a special location (at the grocery store, at a hardware store, etc.).  I’ve then trained myself to check ‘in progress’ items in Trello whenever I’m in one of these states where I can complete these ‘special’ items.

    Review My Cards

    I use the ‘My Cards’ functionality of Trello as the main entry point into exactly what I’m working on ‘now’.  At a minimum, I review this at the beginning of the week and at the end of each work day.  My first priority is always to get a backlog of items, related to an Objective that has high near term ROI, to the ‘next action’ state.  This usually involves digging into ‘blockers’ that are ‘in progress’ and understanding what’s blocking them.  This results in breaking down existing or creating more Task Cards for investigation and adding them to the appropriate checklists.  Often, checklists will need to be reprioritized as part of this review process.

    Common GTD Mistakes to Avoid

    No matter what system you use to practice GTD, be aware of these common pitfalls:

    • Over-Organizing: Avoid creating too many lists, tags, and folders. Only make your system as complicated as necessary to work for you.
    • Under-Reviewing: Regular review sessions are crucial to maintaining a healthy GTD system. Schedule time to update and adjust your system regularly.
    • Not Capturing Everything: Make sure to capture all tasks, ideas, and projects in your system. This helps you stay on top of your work and avoid mental clutter.  Once my brain realized that I was using my system 100%, I’ve never felt so stress free as an adult.

    How are YOU Productive?

    Productivity is a skill that can be developed with practice, patience, and persistence. By implementing these strategies, you’ll be better equipped to manage your time, prioritize tasks, and achieve your goals. Remember to stay flexible and adapt to changing circumstances, and don’t be too hard on yourself when faced with setbacks. With time and effort, you’ll master the art of productivity and unlock your full potential.  What are your favorite productivity tips and tricks? Share them in the comments below!

  • 10 Tech Investments for Small Business Owners

    10 Tech Investments for Small Business Owners

    The world of business is evolving rapidly. Technology has become the cornerstone of success for small businesses, giving freelancers and solopreneurs a chance to face off against larger, more established brands. The good news is that most forms of technology leveraged by larger brands are both accessible and affordable to small businesses as well. From tools that streamline your everyday business operations to marketing analytics software and social media automation apps, Transmutable Explorations has got you covered! These are 10 big ROI tech investments for small business owners.

    Streamlining Your Business Operations

    Efficiency and organization are vital to the ongoing success of your small business, especially if you’re running a one-person operation. Consider these tech investments to streamline your day-to-day tasks.

    Building Your Online Presence

    Today, building an online presence is non-negotiable for businesses of all shapes and sizes. Smaller brands, freelancers, and solopreneurs must work especially hard to stand out in a crowded online marketplace. This is where impactful tech investments can help.

    Marketing and Analytics

    Making data-driven marketing decisions will help you save money, improve your ROI, and better connect with your customers. These are just a few marketing and analytics tools that can boost your marketing efforts.

    In the highly competitive world of business, technology has become an invaluable ally, leveling the playing field for freelancers, solopreneurs, and small enterprises alike. By streamlining your business operations with simple tools like PDF converters, learning how to code to save money, and leveraging free online tools for marketing and content creation, you’ll have everything you need to build a business that not only competes but thrives!

  • Improving Indoor Air Quality

    Improving Indoor Air Quality

     Improving Indoor Air Quality: A Step-by-Step Guide

    Winter is coming!  I’ve been insulating and sealing everything in my home as a way to reduce heating/cooling costs.  Due to this, less fresh air is now actively being pulled into my house.  Because of this, I’ve been thinking a lot more about making sure the air inside is as pristine as possible. Read on for my journey in improving indoor air quality.

    Why Does Indoor Air Quality Matter

    As modern humans we spend more and more time indoors.  This means we cannot overstate the importance of maintaining good indoor air quality (IAQ).  The air we breathe indoors can have a significant impact on our health, cognitive performance, and overall well-being.

    Poor IAQ can lead to a range of health problems.  These can range from mild symptoms like headaches and fatigue to more severe conditions like respiratory diseases and cancer. According to the World Health Organization (WHO), more than 3 million people die every year due to indoor air pollution.  While the majority of these deaths occur in developing countries where indoor burning of solid fuels like wood, coal, and dung is common, I’ll focus more on the types of dangers that occur in modern homes.

    While these modern dangers might not lead to outright death, poor IAQ can exacerbate long term health conditions.  Even more so for those of us who currently work from home, poor IAQ can affect our cognitive performance and productivity.  Studies have shown that reduced classroom air quality can cause a reduction in cognitive performance of pupils, and that good indoor air quality and thermal comfort are prerequisites for human health and well-being.

    Establish a Baseline

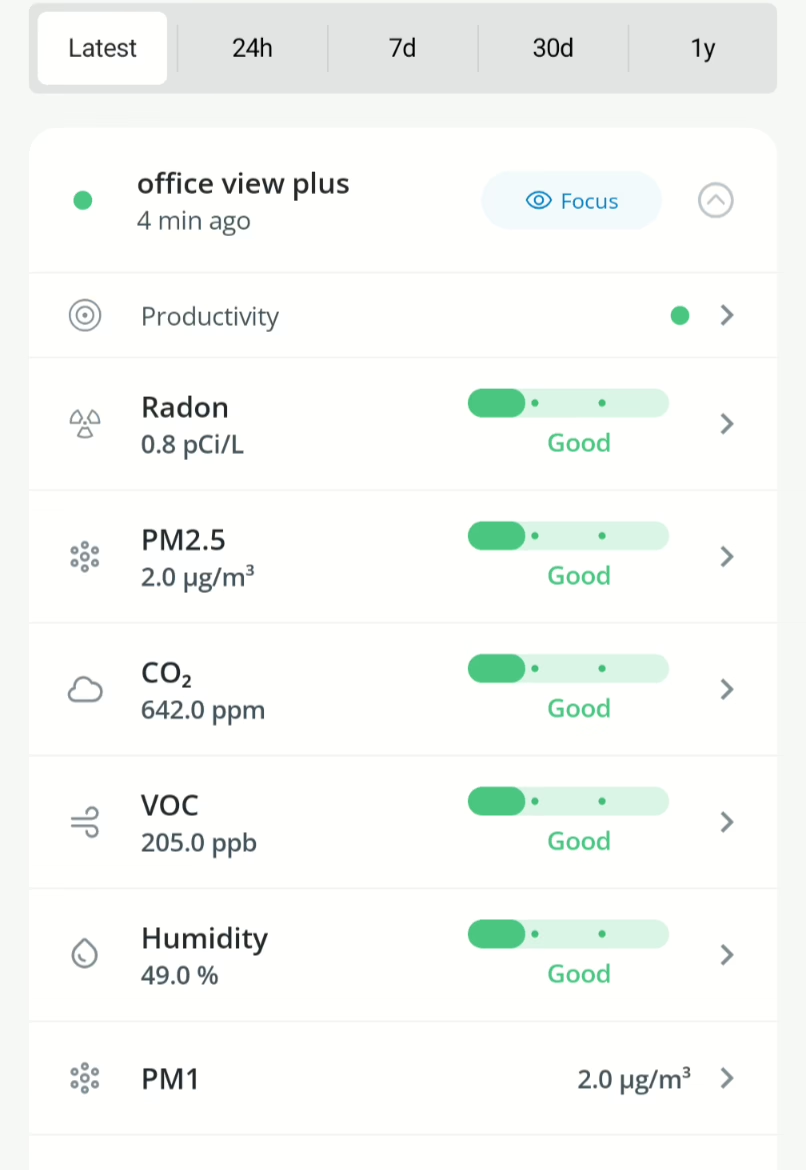
    The first step in improving indoor air quality is to test the air in your home or office.  There are several ways to do this.  You could get hire a professional for a snapshot in time measurement, but I’ve seen radical changes in IAQ throughout the day.  Because of this, I wanted a permanent way to constantly monitor my indoor air quality.  My earliest experiments with this involved home made devices with simple sensors.  I’ve since settled on integrating AirThings products into my smart home system.

    What Impacts Indoor Air Quality

    Indoor air pollution can come from a variety of sources, including building materials, household products, and outdoor pollutants that infiltrate the indoor environment. According to the US Environmental Protection Agency (EPA), certain immediate effects of indoor air pollution are similar to those from colds or other viral diseases, making it difficult to determine if the symptoms are a result of exposure to indoor air pollution.

    Common Indoor Air Pollutants

    Some common indoor air pollutants include:

    • Volatile Organic Compounds (VOCs): VOCs are chemicals that evaporate easily.  They can be found in household products, such as cleaning supplies, paints, and adhesives. Things like furniture, carpets, and building materials can also emit VOCs. VOCs can cause eye, nose, and throat irritation, as well as headaches and nausea.
    • Particulate Matter (PM): PM refers to small particles that can be suspended in the air.  This includes dust, pollen, and other airborne particles. High levels of PM can exacerbate respiratory issues like asthma.  Cooking, smoking, and outdoor pollution also emits PM.
    • Carbon Monoxide (CO): CO is a colorless, odorless gas.  Fuel-burning appliances, such as furnaces, water heaters, and generators can emit CO. CO can cause headaches, dizziness, and nausea, and high levels can be fatal.
    • Nitrogen Dioxide (NO2): NO2 is a gas.  Fuel-burning appliances can emit NO2 but it often arises from outdoor pollution. NO2 can cause respiratory problems, such as coughing and wheezing, and can also exacerbate existing conditions like asthma.
    • Radon: Radon is a radioactive gas that can accumulate in buildings, particularly in basements and crawl spaces. Radon can increase the risk of lung cancer and is the second leading cause of lung cancer in the United States.
    • Mold and Mildew: Mold and mildew can grow in damp environments, such as bathrooms and basements, and can emit spores that can cause allergic reactions and respiratory problems.
    • Pesticides and Insecticides: Pesticides and insecticides used in the home to control pests  can also emit toxic chemicals that can cause health problems.
    • Asbestos: Asbestos is a mineral that was commonly used in building materials, such as insulation and flooring, until the 1970s. Asbestos can cause lung cancer and mesothelioma, a rare form of cancer.
    • Carbon Dioxide (CO2): High levels of CO2 can lead to increased heart rate and blood pressure.  This can exacerbate existing respiratory issues.  By decreasing blood oxygen levels, elevated CO2 has also been shown to cause headaches, fatigue and drowsiness.  Studies have shown high levels can reduce productivity by up to 10%.

    Improving Indoor Air Quality

    Once you have tested your IAQ, depending on what is out of optimal range, you can take steps to improve it.  The AirThings monitoring system that I’ve put together monitors many of these things, but not 100%.  I’ve determined that Asbestos isn’t something that I’m extremely concerned about in my home, so don’t currently monitor that.  For CO monitoring, I’ve been using Nest products.  I haven’t really found a good product for Mold/Mildew outside of keeping the overall humidity in my home low.  I currently have not done enough research on indoor pesticide/insecticides (I tend to just avoid using these in general) and NO2.

    Mitigation Strategies

    There isn’t usually a one size fits all strategy for combating poor IAQ, but depending on what’s problematic, you can consider:

    • Increase ventilation: One of the simplest ways to improve IAQ is to increase ventilation. This can be as simple as opening a window or using a whole-house fan.  Obviously, this goes against the whole thing that started me down this path, but it’s still one of the most effective ways to clean up your air.  I setup my smart thermostats to cycle my fan for 10 minutes every hour just to bring fresh air into the house.  I recently started researching Energy Recovery Ventilation (ERV) systems.  The next time I need to do more invasive work with my HVAC system, I’m seriously considering installing a full blown ERV setup.
    • Maintain your HVAC system: Regularly maintain your heating, ventilation, and air conditioning (HVAC) system to ensure it is working properly and not emitting pollutants.  If your HVAC system incorporates filters, regularly clean/change them.
    • Use an air purifier: One of the next easiest ways to improve IAQ is by purchasing an air purifier.  Air purifiers can help remove many pollutants from the air. Look for a purifier that is specifically designed to remove the types of pollutants you are concerned about.  I became an early adopter of the AirThings Renew purifier.  In my testing, it’s been very effective.  The key with any air purifier is to properly maintain it by cleaning/replacing the filters as needed.
    • Reduce VOCs: Some air purifiers can take care of VOCs, but it’s overall best to just try to avoid them.  A wide range of products, including paints, adhesives, and cleaning products can emit VOCs.  You can avoid VOCs by choosing products that are labeled as “low-VOC” or “VOC-free.”  In general, opting to use non-toxic products will benefit you in more ways than just improving your IAQ.
    • Mitigate sources of pollution: If you have identified a source of pollution in your home or office, such as a gas stove or a moldy bathroom, take steps to remove or mitigate it.  By modifying sources of indoor combustion, you can improve ventilation and reduce what is emitted into the living space.
    • Use plants: This has been one of my favorite ways of cleaning up my IAQ.  Years ago, I read the results of a NASA indoor clean air study that involved several common plants.  Plants are great for mitigating high CO2 levels, but this study found that some were great at removing VOCs and PM as well.  English Ivy has been one of my favorites (just because I have an outdoor abundance of it), but peace lilies have been a close second because of how easy they are to propagate.  Since I’ve recently been focusing on improving CO2 levels in my workspace, I’ve been using snake plants and bird’s nest fern.  An interesting thing that I learned is that many plants actually emit CO2 at night.  This makes them not very good for fixing elevated CO2 levels in the bedroom.  Most succulents do not do this though, so you might want to consider adding a few of those to your bedroom.
    • Use a dehumidifier: High humidity can contribute to mold and mildew growth.  Using a dehumidifier can help keep the indoor air dry and healthy.
    • Install Radon Mitigation:  If testing has shown consistently high radon levels, contact a professional to install a proper mitigation system.  I recently had this done and can discuss the process in more detail for anyone interested.

    Outcome

    Indoor air quality is a critical aspect of our daily lives, and its importance cannot be overstated. Poor indoor air quality can lead to a range of health problems.  It can affect our cognitive performance and productivity, and have a significant impact on our overall well-being.  We can easily understand the sources of indoor air pollution.  Once knowing this, we can take steps to improve indoor air quality.  Ultimately, we can create healthier and more comfortable living and working spaces.  Who’s already taken steps to monitor and improve their IAQ?  I’m interested in hearing about your solutions (Comment or find me on your favorite social platform).

  • Tracking Health and Performance Metrics

    Tracking Health and Performance Metrics

    I remember reading about the Quantified Self movement in the early 2000s. Even though this was something that people were experimenting with for years, I felt that it was a revolutionary approach to understanding and improving our health and well-being.  In the early days, it was difficult to collect and analyze all of the data that would be useful to collect.  During this time, I’ve witnessed the incredible potential of wearable technology and mobile apps to revolutionize the way we track and optimize our health and performance.   In this article, I’ll share my insights on how I leverage the currently available tools in tracking health metrics.

    What is the Quantified Self Movement?

    The Quantified Self movement is a community of individuals who track and measure various aspects of their lives using wearable devices, apps, and other technologies.  By collecting data on their habits, behaviors, and physiological responses, they aim to improve their health, performance, and overall well-being.  The movement is rooted in the idea that self-knowledge through tracking health metrics leads to self-improvement.

    Early Challenges

    In the early days of the Quantified Self (QS) movement, there were several challenges that enthusiasts faced.  One of the main difficulties was the lack of user-friendly technology.  The limited availability of consumer products capable of tracking health metrics created a high barrier to entry for QS membership.  Many early adopters had to create their own sensors and devices to track the data they wanted.  This required a significant amount of technical knowledge and resources.

    Additionally, data privacy and security were major concerns. With the rise of digital tracking and data collection, individuals had to be cautious about what information they shared and with whom. There were also concerns about the potential misuse of personal data by companies and organizations.

    Both of these challenges created a ‘burden of tracking’, even before most interested individuals got to the ‘burden of analysis’.  This led to a general disinterest in the movement from many people.  Despite these challenges, early adopters of the Quantified Self movement were passionate about pushing the boundaries of self-tracking and exploring new ways to improve their lives using data. Their dedication and innovation laid the foundation for the thriving community we see today.

    Quantified Self Today

    Today, the QS movement can leverage a wide range of consumer grade technologies and tools that enable individuals to easily track various aspects of their lives. The community continues to grow, with more people embracing self-tracking as a means of optimizing their health and performance.

    One of the biggest changes in the Quantified Self movement is the increased accessibility of technology.  Gone are the days of building your own sensors and devices; now, there are numerous options available for consumers to choose from, making it easier than ever to get started with self-tracking.  Additionally, advancements in data privacy and security have made it possible for individuals to track their metrics with greater peace of mind.

    As the movement becomes more mainstream, the ‘burden of tracking’ is starting to go away.  The current challenge is now shifting to the ‘burden of analysis’ of sifting through the abundance of collected data.  The struggle for many is now with interpreting and using their metrics effectively.

    Why Track Health Metrics?

    There are several compelling reasons why someone might want to become involved with the Quantified Self movement:

    Increased Awareness/Self-Improvement

    By tracking and analyzing data related to your health, habits, and performance, you can gain valuable insights into your life and make informed decisions about how to optimize it.  Whether you’re an athlete, entrepreneur, or simply someone looking to optimize your daily life, the insights gained from self-tracking can help you identify areas for improvement and make changes accordingly.

    Improved Health/Performance

    Tracking health metrics can help you develop a greater understanding of your body and how it functions, leading to better overall health and well-being.  By monitoring your vital signs and other health metrics, you may be able to detect potential health issues early on, allowing for timely intervention and treatment.  Once a baseline is established, you can manage existing conditions or monitor how various interventions impact you directly.

    Community

    The Quantified Self movement is a thriving community of individuals who are passionate about self-improvement and innovation. By becoming involved, you can connect with like-minded people and learn from their experiences and insights.  The Quantified Self movement is at the forefront of innovation in health and technology, with new tools and solutions emerging regularly. By participating, you can be among the first to experience and benefit from these advancements.

    How To Quantify Your Self

    So how do you go about quantifying yourself?  I’ll enumerate the steps that I think are most important given the current state of things.

    Identify Goals

    The best first step in my opinion is to be clear on ‘why’ you’re doing this.  Are you managing an existing condition? Is there an area of your life that you are trying to improve?  Identifying clear goal(s) in the beginning will help ease both the ‘burden of tracking’ and the ‘burden of analysis’.

    Prioritize the Data Points

    The next step is to identify and prioritize the data that you want to track.  You should have a clear idea on how these datapoints tie into your goals.

    Develop a Storage Plan

    Next, you need to create a plan for how you are going to store your data.  You also need to think about how you are going to analyze this data after it’s collected and be sure that your storage plan supports this.  You should have an idea of how you can get all your data out if you’re relying on a 3rd party system.

    As someone who’s completely invested in the Android ecosystem, my choice has become Google Health Connect.  Google Health Connect is a platform that allows users to centralize and manage their health and fitness data from various apps and devices. It aims to streamline the process of tracking and monitoring personal health information, making it easier for individuals to gain insights into their well-being.  There is also a defined extension method.  This makes it easy for me to develop apps that integrate with Google Health Connect both for entering and analyzing data.

    Identify Collection Methods

    Now that you have an idea of what data you want to collect and how you want to store it, you can narrow down which devices/software support both of these decisions.  Because of its ubiquity in the Android/Google ecosystem, this is another reason why I leaned toward using Google Health Connect as my data storage mechanism.  Almost every device or app that I would conceivably use is already integrated.

    Start Collecting Data!

    It’s time to let the data start streaming in!  At this point, start playing around with your analytics mechanism(s) to make sure that everything looks good.  It’s important to establish a good looking baseline before trying to make decisions based on your data.

    Iterate/Experiment

    Chances are, the first pass through these steps, you’ll find something that doesn’t quite look right and/or isn’t working.  Go back through all these steps until you have everything working in a way that allows you to establish your baseline metrics.  Once you get to this point, it’s a great time to start focusing on improvement or add more datapoints!

    Tracking Health Metrics

    I track a lot of datapoints.  Despite this, there are a handful of areas that I feel are most important to keep regular tabs on because of how easy it is to influence them with everything that you do.  I’ll also discuss how I monitor each of these.

    Sleep

    I keep becoming more and more convinced that sleep is the cornerstone of our health and wellbeing.  It is essential for physical and mental restoration.  I’m mostly concerned with my sleep duration and the amount of time I spend in REM/Deep sleep.  Another good indicator is your resting heart rate while sleeping.  I use the Oura ring to monitor all of these things.

    Activity and Movement

    It’s important to regularly move your body.  I started just by tracking daily steps and trying to adhere to a goal every day.  Eventually, I created a more rigorous workout program to keep me progressing with my body weight workout routine.  Most recently, I’ve set more detailed goals around cardio, identifying the minimal amount of time per week that I want to spend in each heart rate zone.  For me, the FitBit works great for tracking all of these things.

    Blood Work

    I get a full blood panel done at least every 6 months.  There are a ton of biomarkers that I consider crucial and I use InsideTracker to manage this because they include almost all of them.  I would love to see better Google Health Connect integration here because I currently copy this data into MyQuest and SelfDecode in order to make the best use of the data.

    Heart Rate Variability (HRV)

    HRV is a measure of the variation in time between each heartbeat. It’s a powerful indicator of your body’s ability to adapt to stress and recover.  I use this as a measure of determining when I should ‘push’ myself during a workout, etc.  Several devices I use track HRV, but I use the data from the Oura ring most.

    Body Composition

    I tell people all the time that losing weight isn’t always a good thing.  While I definitely track my weight, more important to me is knowing the specifics of my actual body composition.  I want to always be losing mostly body fat while preserving lean mass/muscle.  The only way to guarantee that you’re doing this while losing weight is by keeping tabs on your body composition.  I use a Withings scale to do this.

    Nutrition

    This is an area where the ‘burden of tracking’ is still real.  I’d like to do much more here, but the tools just aren’t quite there yet.  I haven’t found an accurate caloric and macronutrient tracking solution that I feel is worth spending the time on.  The reliable data that I collect here consists of a few things:

    • Use the Zero app to track the time that I spend ‘fasting’.  This allows me to look at how fasting impacts bloodwork measures and body composition.
    • Use the Oura app to track when I take/stop taking supplements.  I use this to define experiment boundaries so I can see how everything else is impacted during that time.
    • Occasionally use a CGM and the Levels app to identify how foods/behaviors impact my glucose response.

    Mindfulness

    Another measurement that I’m looking to expand upon is in tracking my mindfulness state.  Currently, I use the Oura ring and app to track meditation and breathwork sessions.  This takes on a form of heart rate variability training, but anything that decreases my body temp, resting heart rate and breaths per minute is a win for me.  I’ve been investigating picking up a Muse headband to start tracking brain wave state while doing this.  Has anyone used the Muse device?  I’m interested in hearing about it if you have.

    Conclusion

    The Quantified Self movement has come a long way since its inception.  With the availability of more user-friendly technology and a growing community of enthusiasts, it’s easier than ever to get started with tracking health metrics.  As the movement continues to evolve, we can expect to see even more innovative ways to use data to optimize our lives and achieve our goals.  Remember, the key to success lies not in the technology itself, but in how you apply these tools to your daily life. Embrace the power of the Quantified Self and start optimizing your health and performance today!

  • Sprouts Vs. Microgreens

    Sprouts Vs. Microgreens

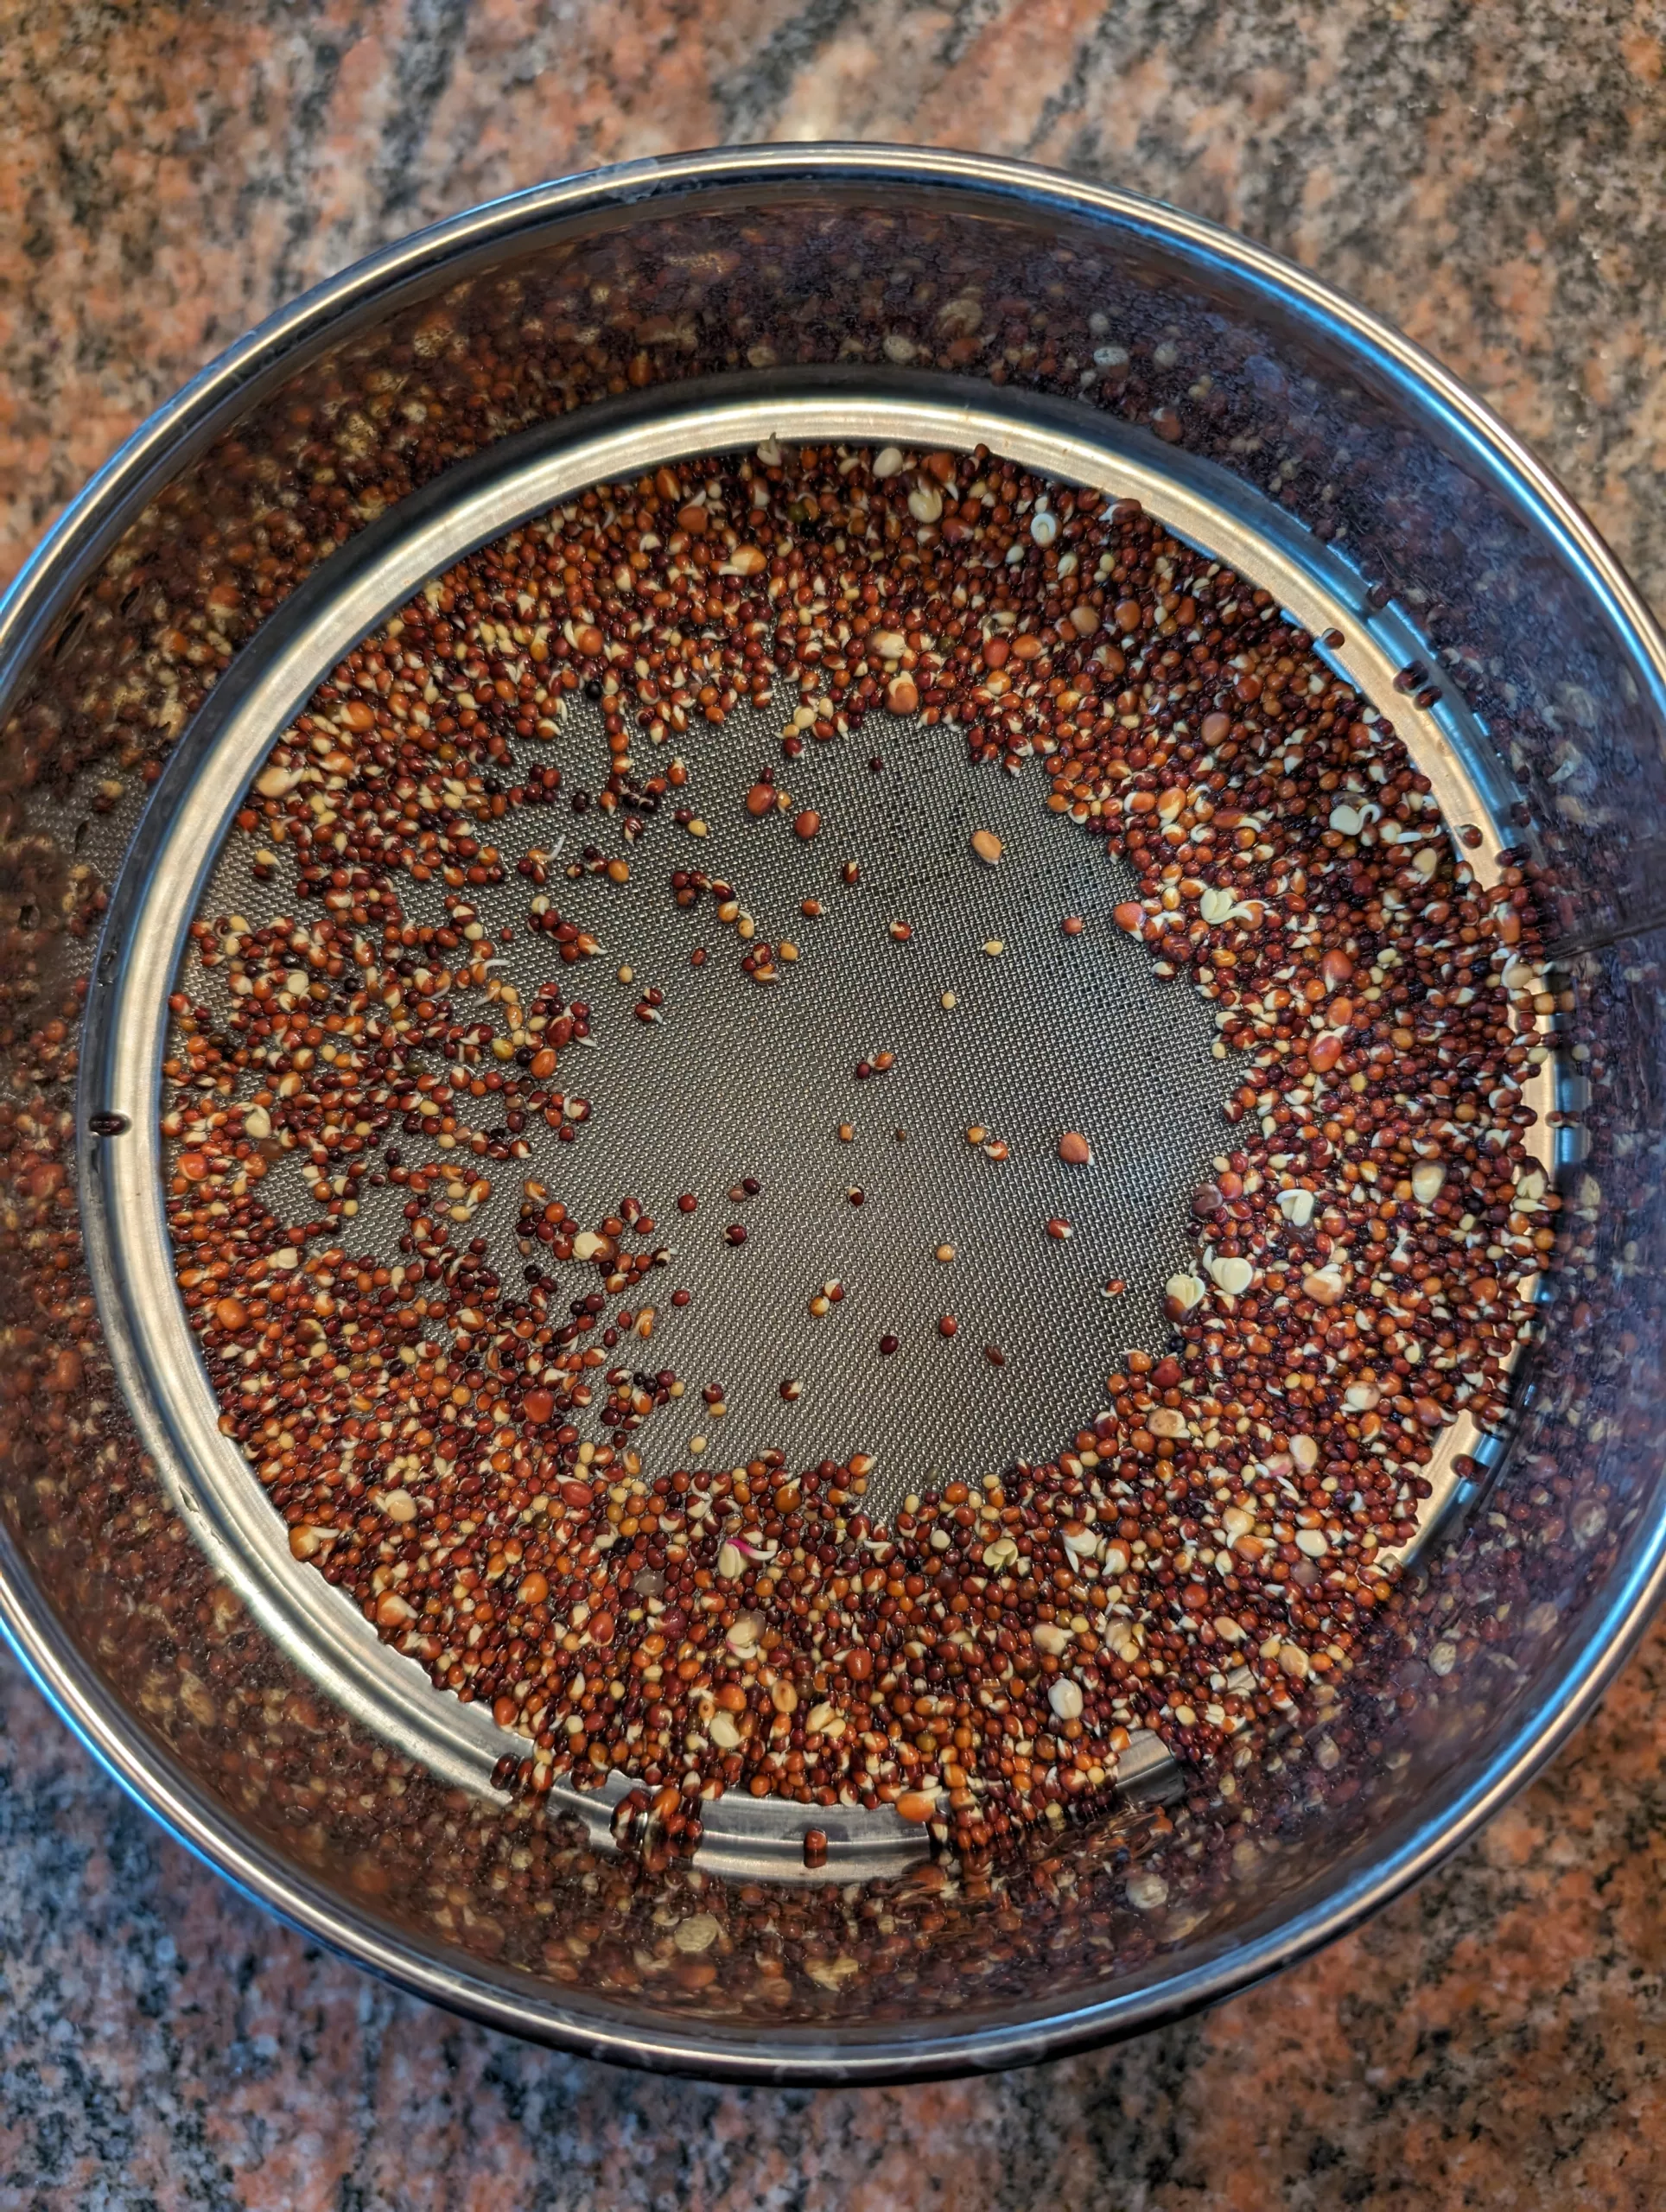
    Are these sprouts?  Are these microgreens?  Is their a difference between the two?  The answer is: Yes there is a difference.  I grow both and if you keep reading, I’ll describe how they differ and which one in my opinion is the overall winner in the Sprouts vs. Microgreens battle.

    Growing Sprouts vs. Microgreens

    So why would anyone want to grow sprouts or microgreens, especially instead of a full grown plant of the same variety?  There are some easy answers here and some others that are more nuanced.

    Lack of Space

    Probably the most obvious reason for growing either of these is a lack of gardening space.   Many of the varieties used for both sprouts and microgreens would require feet of space just for a few plants.  You could grow hundreds or thousands of sprouts or microgreens in this same amount of space.

    Lack of Time

    Another reason for growing sprouts or microgreens is a lack of time.  For full grown plants, you will need a month or more from seeding time before you can actually harvest.  Harvest times for sprouts and microgreens are on the order of days/weeks.

    Lack of Cooperative Weather

    Due to the space and time saving benefits of growing sprouts and microgreens, you can make due with less than ideal weather conditions.  This is mostly because you can easily grow them in your kitchen.  Unlike growing full grown plants the need for bright light and always warm conditions is not necessary.

    Differences in Sprouts vs. Microgreens

    Before growing sprouts and microgreens,  you need to decide which product you ultimately want to harvest.  The following factors should be considered:

    Taste

    Different varieties of sprouts often taste very similar.  Microgreens have more flavor, often this is a more pronounced flavor from the fully grown plant.

    Intended Use

    Sprouts are often served as a garnish.  Microgreens can be combined to form a salad on their own, or used in much the same way as the greens from their fully grown counterparts.  Both can be used in smoothies.  It is recommended that you don’t cook microgreens as this will often degrade the nutrients that are present.

    Nutrition

    Sprouts will only provide the nutritional aspects of what is included in the raw seed.  This differs greatly based on the variety of seed used.  Many sources state that the sprouting process makes these vitamins and minerals more concentrated and available.  Microgreens typically provide more minerals and often a different nutritional profile than their sprouted counterparts.  I’ll discuss why this is when discussing differences in the growing process.

    How to Grow Sprouts and Microgreens?

    Growing either sprouts or microgreens is a fairly similar process.  In both cases, you start with the same seeds that you would plant in your garden.  Commonly used seeds include brassicas, radishes, grasses, beets, herbs and other greens.  In both cases you provide a wet growing environment, but this is where the process starts to differ.

    Growing Medium

    For sprouts, you just need a container that allows you to store your seeds in a way that you can rinse them a few times a day and then let the water drain from the seeds.  Microgreens require a ‘medium’ to grow in.  This medium can be soil, but I like to use hemp or felt pads in a hydroponic environment.  The purpose of this medium is to supply additional nutrients to the plants so that they can grow beyond the ‘sprout’ stage.

    Light Requirements

    Sprouts don’t really require any light.  I tend to finish mine for a few days with indirect light just to make them look nicer.  This can be as simple as leaving them uncovered on a kitchen counter.  Because microgreens are grown into small versions of their typical plant size, a bit more light is required.  This is one of the reasons for the difference in nutritional aspects between sprouts and microgreens of the same plant variety.  Microgreens are undergoing more photosynthesis.  This combined with the added nutrients in the growing medium changes the nutritional profile of the microgreen.

    Time to Harvest

    Sprouts are ready to harvest in a few days.  Once the seed is broken open and a stem and root system are beginning, you can harvest at any time.  Microgreens take a week or more.  With microgreens you want to wait to harvest until the first ‘real’ sets of leaves appear.  When harvesting, you want to eat the entire sprout, stem, root, etc.  You want to discard everything in the growing medium with microgreens and only eat the actual stem/greens.

    The Sprouts vs. Microgreens Winner

    So who is the winner of Sprouts Vs. Microgreens?  For me, it’s sprouts.  I like the quick turn around time and the overall simplicity.  I also like the versatility of being able to add them to almost anything.  Many others are scared away from sprouts because of the chance that the growing environment can be a breeding ground for bacteria and mold.  If this is you, I have a few recommendations:

    1. Always rinse with cold water.  Not using warm/hot water helps keep the environment good for sprouts and bad for the nasties.
    2. Make sure your seeds are adequately spaced and drain properly in between waterings.
    3. Buy seeds from a reputable place.  Starting with high quality seeds that aren’t already contaminated is a great idea.
    4. Visually inspect the environment before each watering.  A quick check for mold or bacterial growth before each watering will allow you to abandon your sprouts the moment you know something is wrong.  Just don’t confuse some ‘fuzziness’ of the early roots for mold 😁
    5. If you don’t feel confident doing these things… Grow Microgreens instead!