Tag: Wearable

  • Siphox Health Review

    Siphox Health Review

    If you’ve been following along for a bit, you might remember that January is one of the months that I always do bloodwork to track the impact of the various health related experiments I do over the year. This month, in addition to my normal work done by InsideTracker, I also tested out a new system from Siphox Health.  Read on for my Siphox Health Review and to see how it compares to using InsideTracker.

    Why Siphox?

    So why did I decide to give Siphox a try?  If you’ve read my review of InsideTracker, you know that I’ve been mostly satisfied and have been using this product for years.  That being said, InsideTracker is fairly expensive.  Because of this, I usually only test twice a year.  With the frequency of experiments that I do, it would be useful to be able to test far more often.  InsideTracker also requires you to go for a full blood draw for each test.

    Siphox’s mission statement is what caught my attention sometime last year: By leveraging silicon photonic biosensors, lower the cost of at-home health testing by 100x and provide results instantly.  Siphox’s system is unique because in theory, you can do everything from home. Instead of a traditional blood draw, it relies on blood spots from a finger prick. The provided special cards are designed to separate whole blood from serum.

    Siphox vs. Insidetracker Comparison

    So how does Siphox compare in practice?  I broke down my comparison into four sections.

    The Platform

    At the time of this writing, Siphox is exclusively a web app.  InsideTracker has both a web and mobile app, with mostly comparable functionality.  Both products provide an ‘action plan’ based on your results, but InsideTracker’s seems far more extensive.  One of the great things about InsideTracker’s mobile support is the regularly provided notifications about new things added to your action plan.

    Both platforms allow you to hookup wearables to supplement your biomarker information.  Siphox supports more wearables and having multiple connected simultaneously.  This is one area that always annoyed me about InsideTracker.  The wearable I use to track activity is not my preferred wearable for tracking sleep, so being able to support both at the same time would be fantastic.  This being said, Siphox seems to only look at the wearable data around when you take the test (and it’s not clear where it’s pulling some of this data from).  InsideTracker regularly looks at (and monitors) your wearable data and provides actionable results.

    Both platforms present your results initially in categories.  The both allow you to search or list individual biomarkers.  Siphox lets you set the ‘optimized’ range to biohacker mode which is more stringent than the normal mode.

    InsideTracker has an early AskAI feature.  I haven’t used this extensively, but it’s something that Siphox does not have yet.

    The Procedure

    Current Routine

    The procedure for obtaining results was what really drew me in to try Siphox.  My current InsideTracker routine requires me to wake up, hop in the car and drive in rush hour traffic to my nearest Quest lab location.  Then I need to fill up several vials of blood (and this number seems to go up each time InsideTracker adds additional biomarkers that they test).

    An Easier Routine

    The thought of waking up, walking downstairs and doing a few finger pricks, scheduling a FedEx pickup and then going on with my day is very appealing.  The reality though, was that it was definitely not this easy.  To test all the biomarkers that I wanted, I had to take several different classes of tests.  A test that only required filling up one card with blood was easy enough, but completing multiple on one day did not work out for me.  I had to use multiple lancets in almost all of my fingers in order to get close to enough blood.

    Worse still was the fact that my blood must coagulate fairly quickly.  It was extremely difficult for me to collect enough blood for one or two spots before I would stop bleeding.  This meant that it took a very long time to do all of these tests compared to the relatively quick blood draw at Quest.  Even more problematic, the design of the Siphox cards penalizes you if you cannot collect the blood spots quickly.  As the blood dries on the cards, additional drops cannot make it through and get separated into the whole blood and serum.  Because of this problem, the first multi test that I took failed and was unreadable.

    The EasyDraw Routine

    I explained these issues to Siphox and they sent me another test with an innovative product to combat this.  Siphox has an EasyDraw device which you painlessly attach to your upper arm (like a CGM).  This creates a vacuum and pumps blood into a vial that you then send back to Siphox bypassing the cards.  EasyDraw costs an additional $20 per test and for some reason ends up testing slightly different biomarkers than the card based tests do.  EasyDraw seems like a requirement for me to use Siphox.  The one drawback of using EasyDraw was that it is difficult to see the fill line on the device when it is attached to your arm.

    After my initial experience, I updated all possible tests to be EasyDraw.  Unfortunately, one of the tests requires two separate EasyDraws and one of them failed.  I tried collecting twice as much blood using a single EasyDraw but this also did not work.

    The Results

    The package that I tested from Siphox covered 35 biomarkers.  InsideTracker covers 47.  Many of the main ones that I’m interested in are covered in both but Siphox had one notable missing one… Insulin.  Also, for someone who specifically is actively testing blood iron implications, I was surprised to see that the only thing relevant tracked by Siphox is Ferritin.  Siphox had 3 biomarkers that I wish InsideTracker did – Free T4, Free T3 and Homocysteine.  It also had several biomarkers that better show kidney function that could come in handy.

    In terms of how the results compared,  I actually received my results in the InsideTracker app far faster than I did in Siphox.  This comparison is even more noticeable if you include the raw results from Quest as the results usually don’t show up in InsideTracker for a few days after the results start to trickle in from Quest.

    I really intended to do an accurate side by side comparison of all of the biomarkers covered by both platforms.  Unfortunately, because of all the issues with taking the tests that ultimately could not be processed by Siphox, only one of the tests were taken at exactly the same time.  This successful test included my kidney (which InsideTracker didn’t test) and liver function.  Albumin was comparable between both tests, but all other liver enzymes were significantly higher as tested by Siphox.  Additionally, Siphox reported my fasting glucose as being 10 mg/dL lower than InsideTracker.

    The Cost

    In terms of cost, at this point in time, Siphox is definitely not cheaper at the frequency that I do testing.  The program that I am on would cost at least $828 a year.  It would actually be significantly more than this because of the requirement to upgrade to the EasyDraw option for several of the tests at $20 for each one.  InsideTracker currently costs me less than $761 per year.  If I tested twice as often, InsideTracker would cost me another $578 for a total cost of $1331 per year.  Siphox is slightly more expensive at $1412 per year total (pre EasyDraw upgrade).

    Siphox Health Review

    At the time of this writing and with InsideTracker’s recent price decreases, Siphox isn’t really compelling from a cost perspective.  The issues with the collection procedure makes it more painful for me than InsideTracker.  The turnaround time to results is also significantly slower.  Being unable to compare more results side by side, I still have open questions about the accuracy of Siphox’s process.

    For me, Siphox would probably need to be half of its current cost in order for me to even begin to consider switching from InsideTracker.   I will likely give Siphox another try in the future to see if the collection procedures have improved and hope that I can do a more accurate results comparison.  If accuracy is comparable between those results and InsideTracker, I will consider using Siphox to supplemently test the biomarkers that InsideTracker doesn’t currently track.  Have you used Siphox? What was your experience? Let me know in the comments.

  • Tracking Health and Performance Metrics

    Tracking Health and Performance Metrics

    I remember reading about the Quantified Self movement in the early 2000s. Even though this was something that people were experimenting with for years, I felt that it was a revolutionary approach to understanding and improving our health and well-being.  In the early days, it was difficult to collect and analyze all of the data that would be useful to collect.  During this time, I’ve witnessed the incredible potential of wearable technology and mobile apps to revolutionize the way we track and optimize our health and performance.   In this article, I’ll share my insights on how I leverage the currently available tools in tracking health metrics.

    What is the Quantified Self Movement?

    The Quantified Self movement is a community of individuals who track and measure various aspects of their lives using wearable devices, apps, and other technologies.  By collecting data on their habits, behaviors, and physiological responses, they aim to improve their health, performance, and overall well-being.  The movement is rooted in the idea that self-knowledge through tracking health metrics leads to self-improvement.

    Early Challenges

    In the early days of the Quantified Self (QS) movement, there were several challenges that enthusiasts faced.  One of the main difficulties was the lack of user-friendly technology.  The limited availability of consumer products capable of tracking health metrics created a high barrier to entry for QS membership.  Many early adopters had to create their own sensors and devices to track the data they wanted.  This required a significant amount of technical knowledge and resources.

    Additionally, data privacy and security were major concerns. With the rise of digital tracking and data collection, individuals had to be cautious about what information they shared and with whom. There were also concerns about the potential misuse of personal data by companies and organizations.

    Both of these challenges created a ‘burden of tracking’, even before most interested individuals got to the ‘burden of analysis’.  This led to a general disinterest in the movement from many people.  Despite these challenges, early adopters of the Quantified Self movement were passionate about pushing the boundaries of self-tracking and exploring new ways to improve their lives using data. Their dedication and innovation laid the foundation for the thriving community we see today.

    Quantified Self Today

    Today, the QS movement can leverage a wide range of consumer grade technologies and tools that enable individuals to easily track various aspects of their lives. The community continues to grow, with more people embracing self-tracking as a means of optimizing their health and performance.

    One of the biggest changes in the Quantified Self movement is the increased accessibility of technology.  Gone are the days of building your own sensors and devices; now, there are numerous options available for consumers to choose from, making it easier than ever to get started with self-tracking.  Additionally, advancements in data privacy and security have made it possible for individuals to track their metrics with greater peace of mind.

    As the movement becomes more mainstream, the ‘burden of tracking’ is starting to go away.  The current challenge is now shifting to the ‘burden of analysis’ of sifting through the abundance of collected data.  The struggle for many is now with interpreting and using their metrics effectively.

    Why Track Health Metrics?

    There are several compelling reasons why someone might want to become involved with the Quantified Self movement:

    Increased Awareness/Self-Improvement

    By tracking and analyzing data related to your health, habits, and performance, you can gain valuable insights into your life and make informed decisions about how to optimize it.  Whether you’re an athlete, entrepreneur, or simply someone looking to optimize your daily life, the insights gained from self-tracking can help you identify areas for improvement and make changes accordingly.

    Improved Health/Performance

    Tracking health metrics can help you develop a greater understanding of your body and how it functions, leading to better overall health and well-being.  By monitoring your vital signs and other health metrics, you may be able to detect potential health issues early on, allowing for timely intervention and treatment.  Once a baseline is established, you can manage existing conditions or monitor how various interventions impact you directly.

    Community

    The Quantified Self movement is a thriving community of individuals who are passionate about self-improvement and innovation. By becoming involved, you can connect with like-minded people and learn from their experiences and insights.  The Quantified Self movement is at the forefront of innovation in health and technology, with new tools and solutions emerging regularly. By participating, you can be among the first to experience and benefit from these advancements.

    How To Quantify Your Self

    So how do you go about quantifying yourself?  I’ll enumerate the steps that I think are most important given the current state of things.

    Identify Goals

    The best first step in my opinion is to be clear on ‘why’ you’re doing this.  Are you managing an existing condition? Is there an area of your life that you are trying to improve?  Identifying clear goal(s) in the beginning will help ease both the ‘burden of tracking’ and the ‘burden of analysis’.

    Prioritize the Data Points

    The next step is to identify and prioritize the data that you want to track.  You should have a clear idea on how these datapoints tie into your goals.

    Develop a Storage Plan

    Next, you need to create a plan for how you are going to store your data.  You also need to think about how you are going to analyze this data after it’s collected and be sure that your storage plan supports this.  You should have an idea of how you can get all your data out if you’re relying on a 3rd party system.

    As someone who’s completely invested in the Android ecosystem, my choice has become Google Health Connect.  Google Health Connect is a platform that allows users to centralize and manage their health and fitness data from various apps and devices. It aims to streamline the process of tracking and monitoring personal health information, making it easier for individuals to gain insights into their well-being.  There is also a defined extension method.  This makes it easy for me to develop apps that integrate with Google Health Connect both for entering and analyzing data.

    Identify Collection Methods

    Now that you have an idea of what data you want to collect and how you want to store it, you can narrow down which devices/software support both of these decisions.  Because of its ubiquity in the Android/Google ecosystem, this is another reason why I leaned toward using Google Health Connect as my data storage mechanism.  Almost every device or app that I would conceivably use is already integrated.

    Start Collecting Data!

    It’s time to let the data start streaming in!  At this point, start playing around with your analytics mechanism(s) to make sure that everything looks good.  It’s important to establish a good looking baseline before trying to make decisions based on your data.

    Iterate/Experiment

    Chances are, the first pass through these steps, you’ll find something that doesn’t quite look right and/or isn’t working.  Go back through all these steps until you have everything working in a way that allows you to establish your baseline metrics.  Once you get to this point, it’s a great time to start focusing on improvement or add more datapoints!

    Tracking Health Metrics

    I track a lot of datapoints.  Despite this, there are a handful of areas that I feel are most important to keep regular tabs on because of how easy it is to influence them with everything that you do.  I’ll also discuss how I monitor each of these.

    Sleep

    I keep becoming more and more convinced that sleep is the cornerstone of our health and wellbeing.  It is essential for physical and mental restoration.  I’m mostly concerned with my sleep duration and the amount of time I spend in REM/Deep sleep.  Another good indicator is your resting heart rate while sleeping.  I use the Oura ring to monitor all of these things.

    Activity and Movement

    It’s important to regularly move your body.  I started just by tracking daily steps and trying to adhere to a goal every day.  Eventually, I created a more rigorous workout program to keep me progressing with my body weight workout routine.  Most recently, I’ve set more detailed goals around cardio, identifying the minimal amount of time per week that I want to spend in each heart rate zone.  For me, the FitBit works great for tracking all of these things.
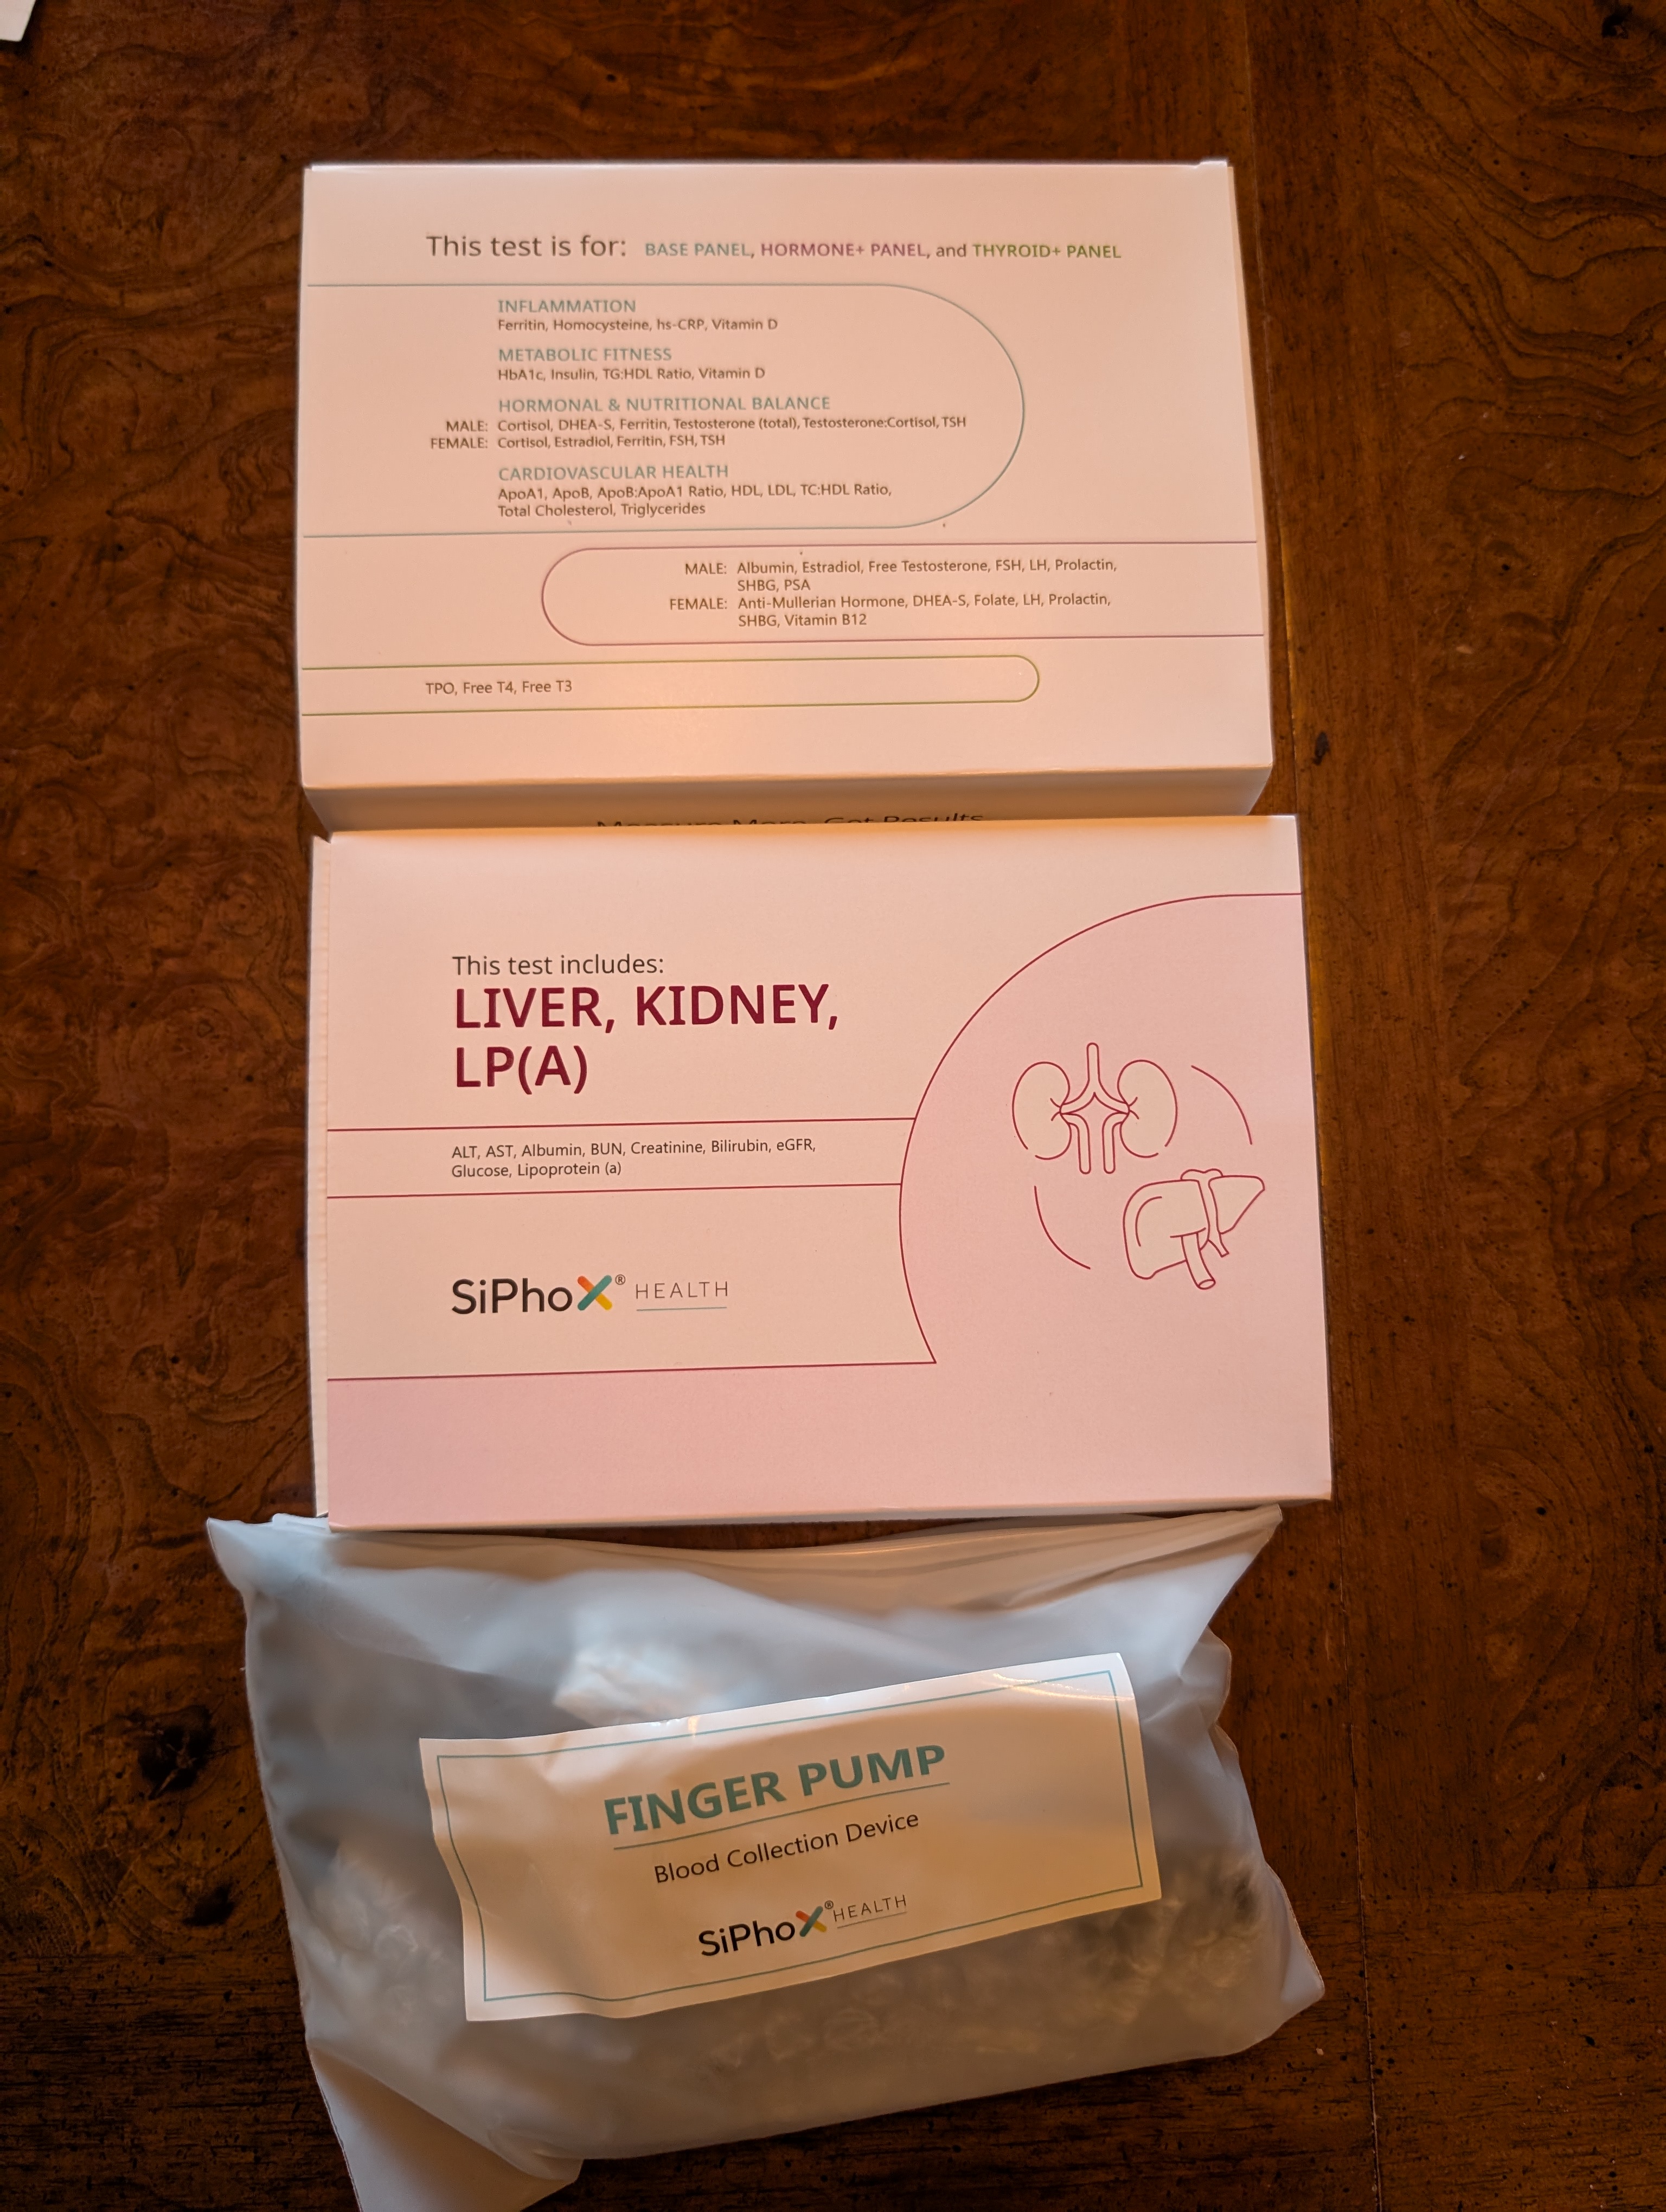
    Blood Work

    I get a full blood panel done at least every 6 months.  There are a ton of biomarkers that I consider crucial and I use InsideTracker to manage this because they include almost all of them.  I would love to see better Google Health Connect integration here because I currently copy this data into MyQuest and SelfDecode in order to make the best use of the data.

    Heart Rate Variability (HRV)

    HRV is a measure of the variation in time between each heartbeat. It’s a powerful indicator of your body’s ability to adapt to stress and recover.  I use this as a measure of determining when I should ‘push’ myself during a workout, etc.  Several devices I use track HRV, but I use the data from the Oura ring most.

    Body Composition

    I tell people all the time that losing weight isn’t always a good thing.  While I definitely track my weight, more important to me is knowing the specifics of my actual body composition.  I want to always be losing mostly body fat while preserving lean mass/muscle.  The only way to guarantee that you’re doing this while losing weight is by keeping tabs on your body composition.  I use a Withings scale to do this.

    Nutrition

    This is an area where the ‘burden of tracking’ is still real.  I’d like to do much more here, but the tools just aren’t quite there yet.  I haven’t found an accurate caloric and macronutrient tracking solution that I feel is worth spending the time on.  The reliable data that I collect here consists of a few things:

    • Use the Zero app to track the time that I spend ‘fasting’.  This allows me to look at how fasting impacts bloodwork measures and body composition.
    • Use the Oura app to track when I take/stop taking supplements.  I use this to define experiment boundaries so I can see how everything else is impacted during that time.
    • Occasionally use a CGM and the Levels app to identify how foods/behaviors impact my glucose response.

    Mindfulness

    Another measurement that I’m looking to expand upon is in tracking my mindfulness state.  Currently, I use the Oura ring and app to track meditation and breathwork sessions.  This takes on a form of heart rate variability training, but anything that decreases my body temp, resting heart rate and breaths per minute is a win for me.  I’ve been investigating picking up a Muse headband to start tracking brain wave state while doing this.  Has anyone used the Muse device?  I’m interested in hearing about it if you have.

    Conclusion

    The Quantified Self movement has come a long way since its inception.  With the availability of more user-friendly technology and a growing community of enthusiasts, it’s easier than ever to get started with tracking health metrics.  As the movement continues to evolve, we can expect to see even more innovative ways to use data to optimize our lives and achieve our goals.  Remember, the key to success lies not in the technology itself, but in how you apply these tools to your daily life. Embrace the power of the Quantified Self and start optimizing your health and performance today!

  • Barefoot Shoes for Foot Health

    Barefoot Shoes for Foot Health

    The Barefoot Revolution: Why You’ll Love Wearing Zero Drop Shoes for Adventure and Beyond

    As we focus on the complexities of modern life, it’s easy to overlook one of the most fundamental aspects of our daily existence: our feet. We stuff them into ill-fitting shoes, pound the pavement, and expect them to perform without complaint. But what if our shoes are actually doing more harm than good? Enter barefoot shoes, a game-changing innovation that’s revolutionizing the way we think about footwear.

    What Are Barefoot Shoes?

    When I talk about barefoot shoes, I’m mostly referring to Zero drop shoes.  The term barefoot shoes can also be used when talking about more minimalist footwear.  In both cases, this type of shoe is designed to mimic the natural stride of the human foot. Unlike traditional shoes, which feature a raised heel and supportive arch, zero drop shoes have a flat, even sole.  This allows the foot to move freely.

    The barefoot shoe design philosophy is based on the idea that our feet are perfectly capable of supporting our body weight and facilitating movement, without the need for artificial support or cushioning.  Minimalist shoes often take this concept further, by minimizing the amount of material between you and the ground allowing your feet to actually sense the ground beneath you.  To me, ‘Zero Drop’ is the most important factor.  Both types of footwear tend to be better than the traditional ‘sneaker’ that we were all raised wearing.

    The Benefits of Zero Drop Shoes

    So, why should you consider making the switch to zero drop shoes? Here are just a few compelling reasons:

    1. Improved Posture: By allowing the foot to move naturally, zero drop shoes promote better posture and alignment. This can have a ripple effect throughout the body, reducing the risk of back pain, neck strain, and other musculoskeletal issues.
    2. Increased Strength and Flexibility: When we wear traditional shoes, our feet become reliant on the artificial support and cushioning.  Zero drop shoes, on the other hand, encourage the foot muscles to work harder.  By allowing your feet to function naturally, barefoot and zero drop shoes can help strengthen your foot muscles, reduce fatigue, and improve flexibility over time.
    3. Better Balance and Proprioception: The flat sole of zero drop shoes (especially in more minimalist varieties) allows for greater sensory feedback, helping us to develop better balance and proprioception (our ability to sense the position and movement of our body).
    4. Reduced Risk of Injury: By mimicking the natural way our feet function, zero drop shoes can reduce the risk of common injuries such as plantar fasciitis, Achilles tendonitis, and shin splints.  These foot strength and flexibility issues are often caused by compensation mechanisms developed from wearing traditional shoes with elevated heels.
    5. Improved Running Form: For runners, zero drop shoes can be a revelation. Zero drop shoes promote a more natural walking or running gait, which can help improve balance, agility, and coordination. By allowing the foot to land midfoot or forefoot, rather than heel striking, runners can reduce their risk of injury and improve their overall form.
    6. Breathability and Comfort: Many barefoot and zero drop shoes use lightweight, breathable materials that help keep your feet cool, dry, and comfortable throughout your activities.
    7. Environmental Benefits: Barefoot and zero drop shoes typically use less material and fewer resources than traditional shoes, making them a more eco-friendly choice.

    The Transition Process

    If you’re considering making the switch to zero drop shoes, it’s essential to do so gradually. Here are a few tips to help you transition smoothly:

    1. Start with short distances: Begin by wearing zero drop shoes for short periods, such as a 30-minute walk or run.
    2. Gradually increase your mileage: As your feet adapt, you can gradually increase your mileage and intensity.
    3. Listen to your body: If you experience discomfort or pain, don’t push through it. Take a break and allow your feet to recover.
    4. Choose the right shoe: Look for a zero drop shoe that offers a comfortable fit and adequate protection for your feet.

    My Barefoot Shoes Adventure

    I’ve been slowly replacing all of my footwear over the last few years with zero drop and barefoot shoes.  I’ve tried a bunch of brands, but there are three specific shoes (from three different brands) that I recommend.  Each one of them has a certain area where they excel.

    Most Barefoot Shoe

    The most barefoot shoe that I wear and actually like is EarthRunners.  I currently wear the Circadian Sandals with Performance laces.  This is both a zero drop shoe and fairly minimalist as well.

    Initially, I bought these to be ‘camp shoes’ that allowed me to let my feet breathe after a long day of backpacking.  I used to use flip-flops for this.  The EarthRunners weigh more than these.  However, one time walking from camp at night to get water convinced me that the extra weight was all worth it.  If a freak occurrence on the trail destroyed my hiking boots, I could likely hike out in EarthRunners without a major problem.  For such an ultra-lightweight shoe, they’re also surprisingly durable.  To top it off, they remain unbelievably secure with the performance laces.  In addition to using this as a general summer time and camp shoe, I also reach for it anytime I’m doing anything in and around bodies of water.

    The Workhorse Barefoot Shoe

    When I am hiking, or active and need something more robust than my EarthRunners, I’m almost always wearing Altras.  I personally love the Altra Lone Peak 6.  Altra is currently on the Lone Peak 8, but I loved the 6 so much that I bought every pair that I could in my size the moment I heard it was being discontinued.  It’s possible the 7 and 8 are even better, but I haven’t tried them yet.

    The Altra Lone Peak 6 is billed as a trail running shoe.  It embodies the principles of zero drop and barefoot-inspired design.  It’s not really a ‘minimalist’ shoe as the rock plate allows you to hike the peaks of Pennsylvania without feeling like you’re on a bed of nails.  Even so, the sole is still very flexible, there is minimal cushioning and the shoes are very breathable.  I like the Lone Peak 6 over other comparable hikers because of the wide toe box.  This allows your feet to assume a natural foot shape rather than being crammed inside while properly navigating elevation.

    The Dress Up Barefoot Shoe

    One of the biggest issues I’ve had in my barefoot shoes journey was finding something that even looked “OK” in situations that required me to be dressed up a bit.  This pretty much ended after I bought a pair of Vivobarefoot’s men’s RA IIIs.  The shoes themselves are fantastic, but Vivobarefoot’s certified B Corp status and commitment to sustainability makes these one of my favorite pair of barefoot shoes.  They also provide great information on making the transition to being a “barefoot” shoe person after a lifetime of wearing more traditional footwear.

    Vivobarefoot is one of the pioneers of zero drop shoes.  I feel that they tend to have fairly innovative and versatile designs. They do this, while still keeping things zero-drop and adhering to the barefoot principles.  I haven’t had to take advantage of it yet, but through their REVIVO program, you can send back your shoes that have reached end of life and they will refurbish them!

    The Missing Link

    If there’s one area where I’m missing a barefoot shoe that I truly enjoy, it’s in general training.  Most of the time I workout in bare feet, but there are some times where I’d like to have shoe protection.  Especially now that I’ve become a regular treadmill user, my next search is to find a barefoot shoe that works great in (ideally) both of these situations.  Have one that might fit the bill? Let me know!

    From conquering mountains to crushing deadlines, my favorite zero drop shoe brands have got you covered. So why not give them a try and experience the barefoot shoe revolution?

    Conclusion

    Embracing barefoot shoes is a journey that requires patience, persistence, and a willingness to challenge conventional wisdom. The rewards are well worth it: stronger feet, better posture, and a reduced risk of injury.  I hope this overview of my journey helps you understand the benefits of barefoot and zero drop shoes even more! If you have any specific questions or want to know more about a particular model, feel free to ask.  Ready to take the first step towards a more natural stride?  Your feet will thank you.

  • Apollo Neuro Review

    Apollo Neuro Review

    When I finally got serious about ‘getting fit’, I bought my first Oura ring.  At the time, I primarily wanted to fix my sleep issues.  A happy side effect of this purchase was that it made me more aware of my Heart Rate Variability (HRV).  I always considered my HRV on the lower side, but quickly realized that I felt my best when it was at the higher end of the range.  Pretty much since this realization, I’ve been experimenting with various ways of raising my HRV.  Many ways of raising HRV involve dedication to a regular practice… exercise, breathwork, mindfulness, gratitude, etc.  This isn’t always easy and started my quest for the ‘easy’ fix for raising HRV.  This led me to discover the Apollo Neuro device.  Read on for my Apollo Neuro Review.

    What Piqued My Interest

    I eventually started to hear about the Apollo Neuro on various podcasts.  It started out as advertisements and I was like “yeah, right, this sounds like complete wishful thinking”.  Eventually I heard an interview with the founder and key employees and thought “Ok, I can see how this *could* work.”  This led me to the Apollo Neuro website where I was initially turned off by the price.  I did sign up for the email list though to keep up to date with what they were doing.  Over time, as I had a chance, I read their blog posts and some of the scientific studies.  Eventually, I decided to take advantage of a sale and purchase one in order to test it for myself.

    What is it?

    So what exactly is the Apollo Neuro?  It’s a haptic wearable.  You can clip it to your chest or wear it around your wrist or ankle and it silently delivers vibrations to your body.  Apollo mentions that it needs to be worn near a bone in order to have its stress resiliency improvement results.  This is how it claims to achieve it’s results.  What’s the exact mechanism of action?  It’s not clear, but my prior research into improving HRV has indicated many positive studies related to both touch therapy and increasing vagal nerve tone.

    My Apollo Neuro Review

    The Software

    In addition to the Apollo Neuro wearable device, there is also a mobile app.  The Android app allows you to control which ‘Vibes’ are played on the device.  At the time of writing, this includes things like Energy, Social, Focus, Recover, Calm, Unwind and Fall Asleep.  For each Vibe, you can control the length and intensity of how each play.  There is a mechanism for scheduling Vibes.

    The Apollo Neuro Android app also collects metrics on usage.  This is used to provide a bit of gamification and estimates on the perceived benefits you’ve received by using the device.

    The Protocol

    My plan was to stop doing anything new to intentionally modify HRV for 2 months.  This would define a ‘baseline’ HRV using my OURA ring.  Care was taken to maintain my same workout, drinking regimen and note using Oura tags any anomalies.  After defining this, I would do the same wearing the Apollo Neuro device.  There was a one week transition period to figure out the ins and outs of the wearable.  The data collected during this week would not be counted for either part of the experiment.

    I quickly found that I most preferred wearing the Apollo Neuro around my left ankle.  Yes, it looks like I’m wearing an ankle monitor, but shorts season is only part of the year!  Apollo recommends using the device for at least 90 minutes during the day and 90 minutes during the night.  I followed the following schedule for the duration of the experiment:

    • 9:00 AM Focus Vibe for 30 Minutes at 20% Intensity
    • 11:00 AM Social Vibe for 30 Minutes at 20% Intensity
    • 1:00 PM Energy Vibe for 30 Minutes at 15% Intensity
    • 4:00 PM Recover Vibe for 30 Minutes at 25% Intensity
    • 7:00 PM Social Vibe for 60 Minutes at 25% Intensity
    • 10:00 PM Fall Asleep Vibe for 30 Minutes at 40% Intensity

    So what did I find out while doing this?

    The Good

    Wearing the Apollo Neuro device using the supplied band was fairly comfortable.  Sometimes socks interfered with wearing it, but overall I forgot most of the time that I was even wearing it.

    It actually works at raising my HRV! Based on my testing, it consistently raises my HRV by almost 15%  Even when drinking.  It maybe related, but my deep sleep averaged an extra 3 minutes during this time as well.  The Apollo app estimates that I’ve been getting 6 minutes of extra overall sleep each night during this time.  Oura is recording significantly more total sleep time than that.

    The different vibes feel noticeably different.  Subjectively, I do feel a difference in response to the different vibes.

    The gamification is nice.  This is a good way to guarantee that I’m regularly checking in with the app.

    The scheduling capability is fairly extensive.  You can configure everything that you would want to do.  Even though I’ve kept my schedule the same every day for this experiment, you can easily change it to be completely different every day.

    Oura ring integration.  Nothing really appears to be done with this yet, but I like that they’re thinking about it.  They’re getting tons of free information from me here, so it would be nice if they would give me something in return.

    The device supports airplane mode.  This is a requirement for me for any wearable that is likely to be used while I’m sleeping.

    The Bad

    Former Android developer speaking here… like almost every wearable device, the Apollo Neuro Android app experience has a lot of room for improvement.  My biggest gripes here are described below (with one major one in the ‘Ugly’ section), but so much more could be done with the gamification and responsiveness of the app.

    No Google Fit/Health Connect support. iOS users can link their Apollo Neuro accounts to Apple Health and track their Apollo wearable usage as Mindful Minutes.  It would be great if the same were done for Android users.  This could also be tracked with the Oura integration.

    Inability to join waitlist for the labs features.  I’ve tried several times and in several different ways to get access to the labs features.  There’s at least one vibe that I’m very interested in: Go Back to Sleep.  In the latest version of the app, clicking on ‘join the waitlist’ appears to do nothing.  NOTE: in a future version of the app, I was indeed able to join and gain access to the labs features.  I was able to trial this out and it was mostly pretty buggy on Android.  I ultimately did not continue with this as it was an additional paid feature of the Apollo Neuro app after my trial expired and it wasn’t something that I found value in.

    There are general issues with syncing data.  It’s not seamless and requires you to constantly connect the Apollo Neuro to the app in order to make sure the app is aware of all of your usage.  You’ll soon see why this is a big problem.  I’ve broken my streak in the gamification because of this issue.  For someone like me, the stress caused by this issue likely counters some of the benefits that the Apollo Neuro wearable seems to provide 🤣

    The Ugly

    The ugliest pain point with the Apollo Neuro is unfortunately an issue with just about every wearable that supports Android.  The app/device is plagued by major bluetooth connectivity problems.  Everyone always blames this on “Android Fragmentation”.  As a former Android developer, this was an issue early on, but it’s really not a valid excuse anymore if you’re properly coding to the Bluetooth stack using modern Android best practices.

    Oura has been one of the only wearable manufacturers that seems to be focusing effort on providing an equivalent experience on Android compared to iOS.  Their app now works very well.  This issue is so bad on the Apollo Neuro that it often takes close to 10 minutes for the wearable to connect to the app.  I’ve experienced this on both the Pixel 6 and 8 Pro.  During a firmware update it once lost its connection resulting in a requirement to factory reset the device in order to make it usable again.

    The device still uses micro USB… the most annoying of the USB connectors.  These days, a device that costs as much as the Apollo Neuro should be supporting USB-C.

    The Apollo Neuro customer support is horrible.  They freely admitted that the Android experience wasn’t what it should be and really didn’t have any suggestions for making things better.  On two occasions they pushed a firmware update that stopped the device from working for days at a time.  The process that they had me go through to fix it the second time ultimately resulted in bricking the device.  This poor support for Android users, ultimately became a deal breaker for me and I returned my Apollo Neuro for a partial refund at the urging of customer support.

    Conclusion

    Overall, I was initially happy with my Apollo Neuro purchase.  If they fixed the bluetooth and syncing pain points, it would definitely be a much more effective device for me.  Being my usual Quantified Self, I look forward to some Health Connect support.  More Oura integration is also intriguing… Apollo is likely getting tons of data from this, but it would be great to see the ability to tag in Oura so I can make correlations.  Another awesome feature would be auto-tailoring your Vibes daily schedule based on data from Oura.  I plan on experimenting more with different vibes and intensities and with wearing the device on other places on my body.  Have you used the Apollo Neuro?

    NOTE: I have stopped using the Apollo Neuro because of the longstanding issues with the Android Software and support.  A firmware update was pushed that ultimately bricked the device.  Apollo support was not helpful in resolving the matter so I ultimately returned the device for a partial refund.

  • Kineon Move+ Review

    Kineon Move+ Review

    I recently got my hands on a Move+ Red Light Therapy device from Kineon Labs. If you’re familiar with my blog, you know that this isn’t the first Photobiomodulation (PBM) device that I’ve used. I regularly use and have written about the 2.0 generation of devices made by Joovv. The Move+ is a different take on PBM.

    Form Factor

    When you first compare the Move+ to similar devices, the most glaring difference is the form factor. Most other PBM devices are various sized ‘panels’. The Move+ incorporates three light modules into an adjustable strap. This makes it ‘portable’ when compared to all but the tiniest panel devices. This alone is a major upgrade for many use cases. I’ve discussed before how one of the most annoying things about using the panel based PBM devices is trying to consistently position them to get a repeatable treatment. This is especially true of the non-full body ones.

    Using red light panels often require you to dedicate your therapy time 100% to the treatment. The need to position your treatment area and the sometimes blinding lights prevent you from doing other things at the same time. The adjustable strap of the Move+ is great for specifically targeting joints while still allowing you to do other things. The red light is focused on the area you are treating and moves along with you. Once setting the strap and modules, you can consistently spot treat in the same way every time. The modules are fully removable from the strap. They can be plugged directly into the included charger in between sessions. The entire system fits in the included carrying case (pictured above).

    kineon red light therapy device

    Red Light Technology

    The PBM technology used in the Move+ is another notable difference. Many panels utilize a combination of red light LEDs (usually in the 660 nm range) and infrared (~850 nm range) that can be independently controlled. The infrared setting of these devices often generates heat. In some cases, added heat is useful, but I often turn off the infrared lights on my panels to avoid the added heat. Each Move+ module has LEDs that emit red light in the 650 nm range, but also has lasers operating in the near infrared range (808 nm). I noticed no additional heat generated using the Move+ during my tests.

    Usage

    Recently, I’ve been working on improving my pistol squat and I have been using the Move+ to enhance recovery after doing so. This device is designed perfectly to use on the knee joint. It works very well and after a few days of using it and trying various ways to reconfigure it for other joints, I started to think about how cool it would be to have more configurable ways of using the modules. Finding an effective way to use it on my ankle was difficult without resorting to some of the techniques I would need to use with the panel style devices. Kineon recently released a video discussing a new strap prototype that they are working on. I can’t wait to get my hands on one of these!

    Update (3/9/2023):  I received the strap prototype referenced above.  It is currently shipping with all new Move+ purchases and can be purchased directly from Kineon if you bought the original Move+.  It is much more configurable, works great for smaller joints and comes with 3 additional ‘module holders’.  These means you have three ‘vertical’ and three ‘horizontal’ that you can combine in any configuration.  See photo below:

    Kineon Move new prototype strap
    This is the next generation strap for the Kineon Move+

    Since the system consists of tiny modules that can communicate with each other, I can definitely see new ‘module holding’ devices that come out in the future that eliminate some of the current limitations of the form factor.

    kineon move+ red light therapy on knee

    I’m going to start an additional experiment with the Move+ in the next week or two. I feel that it is uniquely positioned to excel in this experiment. So far, my experience with this device has been positive. Although it can’t replace every use case that I currently use my Joovv panel for, it excels in some areas to the point that I can’t see going back to the Joovv for targeted joint treatment. I look forward to see what else Kineon produces in the future.

    The Company

    I was lucky enough to have the opportunity to sit down with one of the founders of Kineon and talk about the Move+, his company and other health related matters. It was a great conversation and made me feel even better about supporting what they are doing in this space. If you have specific questions about the Kineon Move+ or my experience with PBM in general, feel free to reach out directly or in the comments. Interested in getting your own Move+?  I have a link that will give you a discount (will show in cart or use code JASONDONMOYER). Try it out and let me know what you think!