Category: Bio-hacking

  • Examine.com/Examine+ Review

    Examine.com/Examine+ Review

    I often get a common set of questions after making new ‘Health’ posts or reviews. “How do you research publications related to what you’re writing about?”  “How do you determine the experiments you conduct in order to reach your goals?”  Part of the answer to both of these questions is: Examine.com/Examine+.  Read on for my Examine review.

    What is Examine.com?

    What exactly is Examine.com?  Their mission statement states it very simply.  “Examine analyzes and summarizes the latest scientific research to help you be healthier.”  In reality, Examine.com is the largest database of nutrition and supplement research on the internet.

    How is Examine Organized?

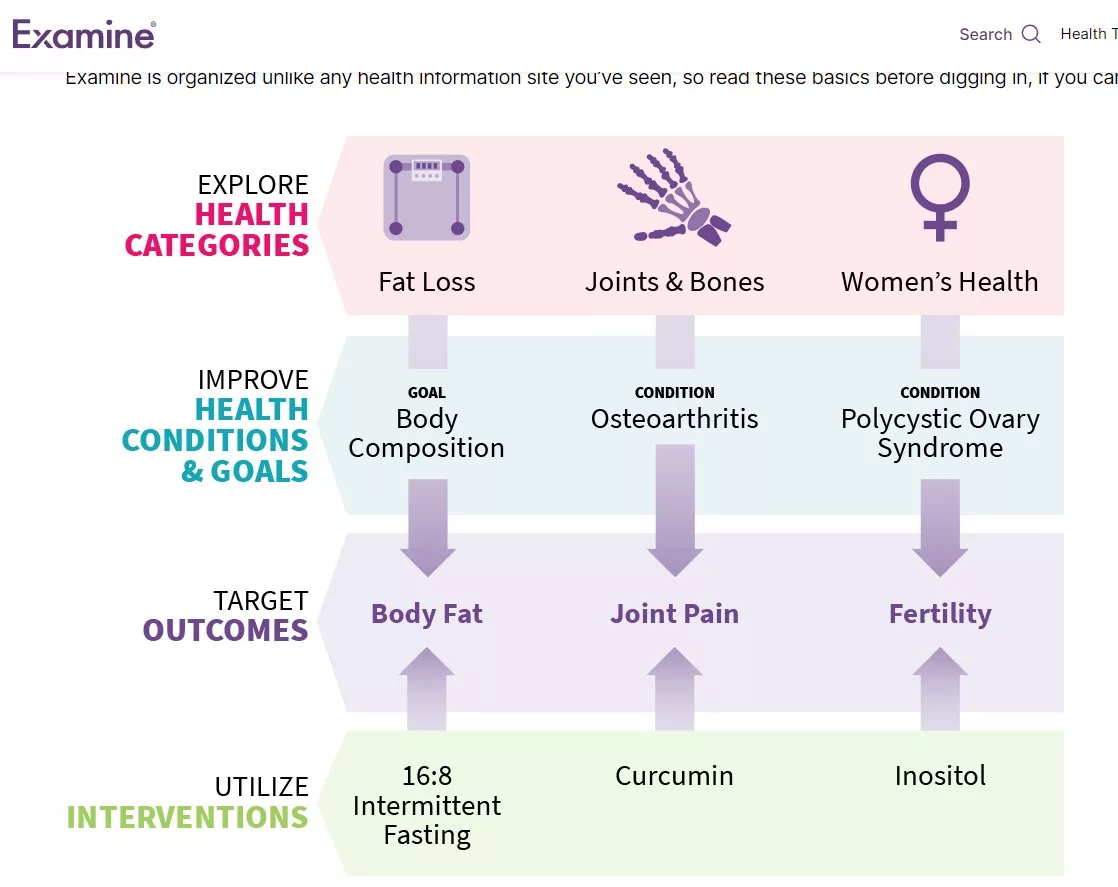
    Examine.com’s main structural element is 25 broad health categories.  Within each of these health categories there are several conditions, interventions and outcomes.  All of these items as well as individual research paper titles are indexed and searchable.

    Categories

    Each Category page is the top level grouping keeping all related FAQs and studies in one place.  Categories mostly exist to make navigating Examine.com easier.

    Conditions

    Conditions can be actual diagnosed health conditions (Hypothyroidism) or goals (Increase Focus).  Goals can exist in multiple categories.

    Interventions

    Interventions are anything that can be tested in a trial.  This is often a specific supplement or practice.

    Outcomes

    Outcomes are specific measurable pieces of data in trials that are used to measure if a specific intervention works.

    What do I like about Examine.com?

    Some things that I love about this organization approach include:

    • It allows you to easily cross reference interventions so that you can easily see which conditions/outcomes each one may impact.  I use this to tweak my own routines based on how something that might be positive for one condition could be detrimental for another.
    • By cross referencing outcomes that have been positive for conditions, you can hypothesize other interventions that might work that don’t currently have published research on them.
    • With awareness of all the conditions that you suffer from that require improvement, you can easily rule out and create a prioritized list of the interventions that are likely to be most effective for you.

    But the organization isn’t the only thing that I like about Examine.com.

    Transparency

    Each piece of information provided on Examine.com references the sources that it is gleaned from.  Opinions are stated as such.  Studies that are missing crucial information that the reader should be aware of are clearly identified.  Anyone who isn’t clear on why this is so important should checkout the extensive reasoning from Dr. Peter Attia.

    Freely Available

    Even before I became a lifetime Examine+ member, I was making extensive use of Examine.com.  This is because all of the information contained in its database is freely available.

    Independence

    Examine.com does not accept funding from outside sources.  Their revenue is not dependent upon pageviews or products sold.  This allows them to avoid sensationalism and maintain a reasonably unbiased viewpoint.  Examine started because it was impossible to find this information in this format at the time.  Examine derives all of their funding from Examine+.

    What is Examine+?

    Examine+ is the unlock of everything on the Examine.com site.  While all of the FAQs are free and you can access most of the database for free, an Examine+ membership allows you to take your research further.  With an Examine+ subscription you unlock the following additional features:

    Supplement Guides

    Plain language information on supplements that cut through all the hype.  Lists the supplements that are likely to work and which ones don’t have the research backing or may be harmful for different conditions.  All referenced to the studies where the information came from.

    Examine Database

    Examine+ also fully unlocks the power of the Examine Database.  All the deep linking between the organizational features and search capabilities are at your fingertips.  All interventions list every tested outcome without the need to go searching on your own.  The same is true for conditions.  They are now linked to all relevant interventions contained in the database.  While you could find much of this same information with the free product, this is an enormous time saver.

    Personalized Research Feed

    With Examine+ you can also create a personalized research feed that contains summaries of all new summaries related to the health categories that are of interest to you.  This allows you to keep an eye on the latest research so that you can reevaluate any action that you may have taken based on prior information.

    Examine Review Conclusion

    Since I mentioned that I am an Examine+ user, it’s probably clear that I feel favorably about this product.  The reality is that I’ve been using Examine.com/Examine+ as my ‘top of the funnel’ research tool for years.  I really haven’t found anything better that works for me.  If you liked what you read in this Examine review and aren’t already using it, try it out!  Interested in becoming an Examine+ member?  I’d appreciate it if you used my link to sign up.


  • SelfDecode Review

    SelfDecode Review

    In many of my ‘Health‘ related posts, I write about how just about everything I do is informed with data.  This data comes in many forms, wearables, blood work, subjective feeling.  The best experiments that I’ve done usually start with hypotheses that arise out of research that I’ve done related to DNA analysis.  I’ve tried many of the existing DNA analysis services, but my favorite has been SelfDecode.  This is my SelfDecode DNA Review.

    I started using SelfDecode because I came across one of their blog posts.  Like many health related blogs, much of the information was high level and generic, but in this case, there were direct references to Single Nucleotide Polymorphisms (SNPS) and how they related to the information provided.  I also noticed that if you signed up to use the SelfDecode DNA platform, there was a promise that you could ‘see’ this blog post tailored toward your specific genetic predisposition.  This was very appealing to me.  It didn’t take long for me to decide to give it a try.

    What is SelfDecode DNA?

    Even though the blog posts are what initially drew me in, the SelfDecode platform consists of several components.  Obviously DNA analysis is a crucial piece.  SelfDecode also has a Labs, Lifestyle Analyzer, Action Plan and (more recently) Ancestry section.  I’ve used all of these except for the Ancestry section, so I’ll leave that out of my review.

    DNA

    I started using SelfDecode by uploading one of my existing DNA files that I already had on hand.  SelfDecode also provides their own DNA testing service, but it’s not required to use most of their services.  This is the main reason why I haven’t used SelfDecode’s Ancestry features as it requires using SelfDecode’s DNA testing kit.  The SelfDecode DNA section is subdivided into a set of reports and the blogs that I mentioned before.

    Reports

    The reports are further subdivided into Health, Disease, Traits and Biohacker.  Health reports are high level summary reports related to broad areas of health like Inflammation, Gut Health, etc.  Disease Reports are related to specific diseases.  In order to ‘unlock’ Disease Reports, you need to schedule a consultation with a medical professional to discuss them.  Trait Reports are related to your likelihood to have certain characteristics.  What color hair are you most likely to have?  Are you an extrovert or introvert, etc.  Finally, the Biohacker reports are related to more unconventional topics and/or studies that are of lower quality.

    From the main report subsection, you can filter reports based on things like ‘highest risk’ or ‘most recently updated’.  Each report is listed with its name, a summary of what it covers, when it was last updated and a graphic that shows at a glance if your genetic data is potentially a cause for concern based on the collected information.  From this overview card, you can also add reports to your ‘favorites’ for easy access in the future.

    After clicking on the summary, all reports show the supporting data and your results based on your genetics.  This contains links to overviews of each related Gene and SNP along with your specific genotype.  Each report also contains a ‘next steps’ section which has your lab work (if anything related has been uploaded), any lifestyle data that you’ve entered and recommendations tailored to your results.  You can click on any of the recommendations to add them to your Action Plan.  This section also includes links to any related reports and blog posts.  You can also generate a PDF that contains your specific results.

    Blogs

    The Genetic blogs are categorized loosely based around the Health Reports.  From this section, you can narrow down the blogs based on category or search for a specific term to find the items that are of interest to you.  Each post is written by a different subject matter expert on SelfDecode’s team.  They all follow a similar format.  First they identify the gene(s) and SNPs involved in the subject of the blog post.  Just like in the reports, your specific genotype is identified in a personalized section of the blog post.  Most blogs also include diet, lifestyle and supplement recommendations that you can consider if you suffer from the issue described in the post.

    Labs

    The Labs section of SelfDecode allows you to input your lab work and view your results over time.  Inputting lab work is as simple as uploading a PDF of your results and SelfDecode does a pretty good job of importing everything correctly from there.  In the results viewer, anything considered out of range is identified and you can easily view past results.  This information is also surfaced in any relevant reports when you are viewing your ‘next steps’.  This is great because you can see if the biomarkers that you need to be concerned about based on your genetics are actually out of range or if the lifestyle/supplement choices that you are following are having a positive impact.  SelfDecode also allows you to shop and schedule lab work from this section if you aren’t already testing them via other means.

    Lifestyle

    The Lifestyle Analyzer asks you questions about things that you are currently doing and your medical history.  Based on this, and your SelfDecode DNA analysis, it presents cards that show your relative risk for several different medical conditions.  When you view the details for each of these items, there are links provided to relevant reports and blogs.  At any point in time, you can retake the lifestyle assessment for each of these conditions.

    Action Plan

    The Action Plan contains a summary of all of the recommendations that you’ve added to it from your DNA reports.  For each item in your action plan, you can click on it to see a summary that contains the potential issues that this item can help you address.  If your Action Plan includes supplements, you can actually create and purchase a custom supplement formulation from SelfDecode (I have not done this yet).  There is also a Meal Plan builder in this section.  This is a relatively new feature and I have not used it extensively.  The Meal Plan builder allows you to plan a week’s worth of meals with a limited list of foods that SelfDecode feels is optimized for you.

    Recommendations

    If you don’t actually add recommendations from your reports to your Action Plan, you can still see all of your recommendations sorted by how often they occur in your reports in the Recommendations section.  Just like in the Action Plan, you can see the same summary from here.  You can also add recommendations to your Action Plan from this section.  In the My Supplement sub section you can generate and purchase your supplement formulation.  This is the same functionality that is exposed under your Action Plan.

    SelfDecode DNA Review

    If you’re a regular reader of mine, it’s probably not a secret that SelfDecode is my favorite DNA analysis platform.  I honestly use this product multiple times a week and have discovered so many that things that have had a noticeable benefit on my health because of the information contained here.  The DNA reports and blog posts are really some of the most informative out there and they are constantly adding new information.  They provide the perfect level of summary information with links to dig deeper into the data used to create the summaries.  I quickly purchased a lifetime subscription based on this information alone.

    I also use the Lab Analyzer, mostly because it adds so much more to the reports.  The Lab Analyzer is not as good as InsideTracker‘s, but then InsideTracker’s DNA component is laughable compared to SelfDecode’s.  I’ve been uploading all of my lab results to both products as they tend to complement each other nicely.

    I don’t use the Action Plan.  That’s mostly because the Recommendations section works well for me.  I’m also not much of a fan of subjectively tracking lifestyle behaviors.  The main reason for this is that the effort required to do so isn’t worth it if I don’t have a mechanism to go back and analyze past data and its impact in the future.  I prefer my current approach of using Oura to do this, but even this can be improved upon.

    Additionally, I haven’t purchased any of SelfDecode’s add on projects.  I’m not a fan of combined supplements and already have several places that I love where I purchase single formulations.  I’ve been getting custom lab work done since before I started using SelfDecode, but I plan on evaluating the cost competitiveness of this item in the future.

    Conclusion

    I think the DNA reports and customized blog posts alone are worth the $599 lifetime subscription.  If SelfDecode continues the pace of innovation that I’ve seen since I’ve been a member, it pays for itself within a few short years.  If you’re interested in using any of SelfDecode’s products, let me know as I occasionally get discounts that I can pass along.  I’d also like to hear from you if you have used any of their lab work or supplement services!

  • In Pursuit of Metabolic Flexibility

    Origins of the Pursuit for Metabolic Flexibility

    There was a time when I was a big advocate of ‘grazing’.  Everything I was taught growing up emphasized this.  Breakfast is the most important meal of the day.  When I began playing sports, it was crucial to be eating constant small meals in order to ‘maximize gains’.  I figured the people telling me this must know best, so I never really questioned it.  I experienced midday crashes for years without really thinking about this practice.  The fact that I got extremely ‘hangry’ any time I missed a meal or snack just seemed to reenforce that this practice must be correct.

    Realizing there was a problem

    Eventually, I didn’t workout as much and I started putting on extra weight.  I started looking for a quick fix to drop the weight.  I read about different diets and saw firsthand how many friends of mine seemed to just melt it off following a ketogenic diet.  Just about every one of those people found that this diet worked until you no longer strictly adhered to ‘Keto’ and then you would quickly put the weight back on.  Even worse, some of these people developed issues with being able to eat the foods that they did before adopting Keto.  Carbs and Gluten became issues for them.  This pretty much confirmed that Keto was not for me.  This eventually lead me to Intermittent Fasting or my preferred term for what I was doing… Time Restricted Feeding (TRF).

    What I thought was the solution

    TRF was initially very difficult for me.  The blood sugar rollercoaster that I had been on for years did not want me to get off.  Initially, I cut out late snacking and eventually breakfast.  I used Zero to track my fasts which helped gamify things.  Zero also turned out to be a wealth of information.  I kept up with and actively participated in the research being conducted by the Zero team.

    Eventually, I worked up to following a strict 18:6 protocol every day except for Saturday and Sunday (almost anything went on the weekend). Occasionally, I’d alter one day a week to 16:8 to accommodate any meetings or events that I had scheduled. I chose the 18:6 protocol because around this same time, I was reading about the benefits of autophagy on someone my age.  Research showed that longer periods of fasting have a more profound impact on autophagy.  So I strived to do at least 18 hours of fasting and occasionally stretched to One Meal a Day (OMAD).    Around this time, I started measuring the impacts of my experiments in TRF using Levels and a breath-based ketone monitor.

    Fueling the Human Machine

    All of the research I had done into Keto, opened my eyes to the fact that the human body operates on two main fuel sources… fat oxidation and glucose oxidation.  Keto was so appealing to me initially, because why not use the thing to fuel my body (fat) that I was most interested in losing?  TRF started to have a profound impact on my blood sugar spikes, but I wasn’t satisfied with the level of ketosis that I was achieving.  How am I going to lose fat if I’m barely ever getting into a base level of ketosis?

    Feast and Famine

    This lack of ketosis, combined with the pursuit of ever more autophagy, eventually led me to adopting a 24+ hour fast at least once a month.  Research was starting to point to regular fasting having many positive benefits for the common diseases of aging.  This made sense to me.  The longer fasts definitely resulted in me losing weight, but DEXA Scan testing showed that much of that weight was muscle mass and not fat mass!  More research would eventually educate me why this was so.  My body wanted to be fueled by glucose and it would do whatever was necessary to make that happen.

    General consensus is that the current abundance of over nutrition is a very recent phenomenon for humans.  Our hunter gatherer (and even more modern) ancestors likely spent much time in a ‘fasted’ state between meals.  Before the advent of grocery stores, it wasn’t so easy to constantly graze and any excess nutrition would likely either be consumed immediately or if possible saved for times of famine.  Maybe it’s not so much a coincidence that the issues that just about every one develops beyond a certain age might be related to this relatively recent change in our eating habits?  More in depth reading on how the body stores fat and how it powers processes in the absence/presence of glucose eventually led me to discover the concept of Metabolic Flexibility.

    What is Metabolic Flexibility?

    Metabolic Flexibility is the ability for your body to easily switch between burning glucose or fat for fuel.  Things like insulin resistance and the grazing that I used to advocate for destroy metabolic flexibility.  Unfortunately, insulin resistance is not something that you can easily monitor in real time.  If you have a high fasting glucose though, you are likely insulin resistant (and therefore metabolically inflexible).  If you are metabolically inflexible, your body will tend to prefer processes that it can go through in order to create glucose rather than start burning fat.  Due to this, the fat burning process won’t really get turned on.  You can also experience metabolic inflexibility if you stay in a state of ketosis and then have an influx of carbohydrates come into your diet.  The goal of Metabolic Flexibility is to be able to seamlessly switch between fuel sources based on what is currently available.

    What’s even better?  Achieving Metabolic Flexibility appears to be one of the most effective things you can do to combat metabolic disease.  What is metabolic disease?  There is a growing body of evidence that this is the precursor to just about every one of the diseases of aging that plague our modern society.

    Achieving Metabolic Flexibility

    There are many ways that you can achieve metabolic flexibility.  They all involve having awareness of how your body uses glucose, paying attention to your diet, exercise, some form of TRF and appropriate recovery.  I’m going to discuss the approach that I have been taking in order to increase my metabolic flexibility.

    Exercise

    I have a workout routine based on progressing every 7 days.  My workouts consist of bodyweight exercises that I can do anywhere.  When I’m home, I have additional equipment that allow me to increase the difficulty.

    I used to do a version of this workout early in the morning, but have moved the bulk of strength training to immediately before I break my intermittent fast. The reason for this is due to a number of studies that have shown interesting things that occur to the AMPK and mTOR pathways while strength training in a fasted state. I can talk about this all day, but the basic gist is that training while fasted and then immediately breaking that fast with the right type of meal has been shown to have positive impacts on muscle preservation while fasting as well as fat loss and insulin sensitivity. Working out fasted also depletes muscle glycogen setting things up to replenish this when you do eat rather than moving it into other unwanted forms of storage.  When I first read these studies it sounded too good to be true, but I’ve verified the results in my own testing and the analysis from Levels also confirms these benefits for me.  Occasionally, I will break my fast first in order to prevent anything from becoming too routine.  

    Diet

    All of my research and monitoring has lead me to prioritize a whole food diet and I split up the month into ‘weeks of focus’.  The areas of focus include:

    • Strength
    • Insulin Sensitivity
    • Autophagy
    • Thyroid

    For each week, I tailor my diet, supplements and TRF around the current area of focus.  Each day within the week gets tailored further based on the workout that I’m doing.  For the most part, I’m following a modified cyclical Keto diet, lower carbs and calories when I’m focusing on catabolism and higher carbs/calories when I want to be more anabolic.

    TRF

    I moved away from TRF with strict long periods of fasting.  Instead, I try to fast for a minimum of 13 hours every day, ramping things up when I’m in catabolic periods.  During Autophagy week, there’s usually at least one 24+ hour fast.  Again, the more complex schedule is to prevent anything from becoming routine.

    Glucose Awareness

    I’ve been using a combination of continuous glucose monitoring with Levels and blood tests from InsideTracker.  In an effort to level off spikes in blood sugar, I use several combinations of things that work for me based on monitoring with these devices.  Some of the things I use include: Apple Cider Vinegar, chromium (when favoring anabolism) or berberine (during catabolism) before meals.  During meals, I mix some glycine in my beverage to assist even more.

    Repair/Recovery

    When focusing on recovery with regards to my approach to improving Metabolic Flexibility, the most important things are good quality sleep and keeping your thyroid in good health.  I plan on writing a post in the future on my journey to get good quality sleep.  Keeping your thyroid happy, basically boils down to carb refeeds and relaxing use of some supplements during ‘Thyroid week’.

    Metabolic Flexibility Marathon

    The journey to Metabolic Flexibility is definitely a marathon and not a sprint!  Even though I’ve made some progress, I still feel that I have some way to go.  Each time I retest, I see incremental improvements and I feel better than I have in years.  I’m constantly tweaking this program as I learn more and intend to update this post.  What are your thoughts? What are you doing differently?  If there is something that I glossed over that could use more information, let me know!

  • InsideTracker Review

    InsideTracker Review

    I’m constantly experimenting with ways to improve my health.  Experiments should always begin with a hypothesis.  They should also be designed in a way to control as many variables as possible.  If you don’t have a way to measure outcomes, you’re just guessing about the overall effectiveness of what you’re testing, no matter how well designed your experiment is.  It is in this context that I’m providing my InsideTracker Review.

    When it comes to these types of experiments, keeping track of biomarkers are crucial for testing hypotheses. Being able to compare this collected information over time is also important.  This can be used to inform future experiments and potentially identify variables that weren’t properly controlled.

    Wearables have become great ways to do much of this validation.  Despite this, there are still many things that require good old blood (and other) tests in order to get accurate measurements.  If you’ve ever tried to convince a doctor to order a test for a specific biomarker that is deemed ‘non-essential’, you probably know that this isn’t always easy.  I have terrible insurance (like many self-employed), so even basic tests aren’t covered.  Because of this, I’ve been using various biomarker analysis platforms to conduct (and analyze) many of my tests.

    InsideTracker Review: the Platform

    One of the more recent platforms that I’ve used for obtaining and tracking biomarkers is InsideTracker.  InsideTracker allows you to input and analyze your bloodwork, DNA and compute your InnerAge. There are several plans that you can choose from.  My InsideTracker review follows.

    The Plans

    The basic plans are differentiated by which features of the platform you would like to use and what your starting point is.   If you already have data, you can purchase a plan that allows you to upload your results for analysis.  In most US states, you can also arrange your tests directly through InsideTracker either by going to a Quest lab or scheduling a mobile blood draw.

    Because the testing is done through Quest, you get access to the raw data. I find this useful so that I can enter it into other systems.  This makes it so that I always have a running history of biomarkers that I can compare.

    I tested InsideTracker’s Ultimate Plan.  The Ultimate Plan currently tests and analyzes 44 biomarkers (ApoB was added since I’ve done my last test which now makes InsideTracker even more interesting).  In order to best test the platform, I added the InnerAge calculation to both tests as well as the ability to analyze my uploaded DNA results from another provider.

    InsideTracker is not inexpensive, but you can purchase several tests at once and get a discount.  The tests are also HSA/FSA eligible.

    The Blood Draw

    I opted to go to my local Quest lab for the blood draw (mobile draw is available in most states for an added $100).  Everything regarding scheduling can be coordinated on the InsideTracker website.  InsideTracker also provides instructions for things to do/avoid before testing.  Basically, water fasting the night before and abstaining from any vigours exercise for a few days before.  InsideTracker also provides a form that you print at home and bring to the lab.  My experience at Quest was typical of most blood labwork.  Maybe there were a few more vials that I had to fill, but I was in and out within 15 minutes.

    The Website

    While waiting for your lab results to make their way to InsideTracker, it’s a good time to fill out your health profile on the site.  This information ultimately factors into the information that InsideTracker provides.  My results took a few days to process but they appeared in InsideTracker the same day that I had my raw results from Quest.  At this point, logging into the website shows a dashboard consisting of color coded biomarkers (red, yellow, green) and your InnerAge score if you added that.

    Biomarkers

    From here, you can drill down into more details about each biomarker and biomarker group.  This detailed information often includes ways that you can ‘improve’ your next measurement and links to various research and blog posts backing up that suggestion.  I found the provided information to be more accurately actionable than other services that I’ve used.  I feel that InsideTracker is definitely looking at all of the data it has available to make suggestions that may actually apply to me rather than generic suggestions that might apply to the general population.

    InnerAge

    If you added InnerAge, you can drill down into the score and see how various biomarkers impact or detract from that score.  I was happy to see that my InnerAge was almost a decade younger than my ‘actual’ age.  The science is still out on many of these biological age clocks.  While seeing which biomarkers impacted my InnerAge was very interesting, I did not get as positive results with other services that I’ve used that measured biological age in other ways.

    DNA

    If you uploaded your DNA information, you will also have a section that shows your DNA analysis.  I found this section to be the most basic information that InsideTracker provides and the analysis here is no where near the level provided by other services that I use.  I’m not sure how much of this factors into the excellent information provided on the biomarker pages, but if I knew for sure that it did not, I would not recommend adding this as an upgrade as you can get far better results from other sources (I personally like SelfDecode DNA for this purpose).

    Action Plan

    Finally, InsideTracker allows you to create an Action Plan where you can add their suggestions that are of interest to you and then track your progress against them.  I feel that this is probably useful for people that aren’t already tracking this in some other way.  There is some gamification tied to this.  Checking in your progress against your Action Plan updates your wellness score and you earn ‘badges’ as you do more and more things in the InsideTracker platform.

    Many platforms like this, immediately drive you toward supplements (often custom made for you) and pharmaceuticals in order to improve your biomarkers.  InsideTracker doesn’t have supplements to sell, so I like the fact that they don’t focus on this solely.  Instead, they provide a ‘Nutrition’ section that focuses on foods and recipes that would be good for you to try.  I found that taking this information and cross checking it with my Viome results really worked well for me.

    The Mobile App

    In addition to the website, InsideTracker also provides a mobile app.  Most of the features mentioned are available via this app, maybe with less detail.  The mobile app is useful for checking into your Action Plan.  It also allows you to integrate an activity/fitness tracker.  Unfortunately, on Android, only Fitbit and Garmin Connect are supported.  Because of this, I was unable to test how this impacts results.  This is likely my biggest complaint about InsideTracker.  Why isn’t Google Fit/Health Connect supported on Android?

    I’ve found the mobile app useful for another reason.  If you turn on notifications, you’ll get ‘Pro tips’ every so often.  I’ve found some of these to be very actionable.

    Results Comparison

    I had non-optimized biomarkers from my first test and actually followed some of the suggestions to actually improve them before my recommended next test.  Even though this was the case, the real value of getting bloodwork frequently comes in comparing results from test to test.  How else will you know if you’re actually making progress or not?  I felt that InsideTracker’s interface is one of the better ones for being able to do this comparison.

    Conclusion

    Overall, InsideTracker was well worth it for me.   I found the biomarker optimization and protips to be very useful.  The ability to compare biomarkers across tests was also a major benefit.  Because of this, I will continue to use it as my platform of choice for blood based biomarker analysis.  Especially considering that they seem to be actively adding new ones that are of most interest for healthy living that typical blood tests do not cover.  My only real complaints are regarding the value of the DNA add-on and the lack of integration with some of the more commonly used fitness trackers on Android.  The DNA analysis seemed lacking when comparing the direct results to other services.  Despite these drawbacks, I still consider InsideTracker a useful tool.  Just please add Health Connect support!  Have you used InsideTracker?  Let me know your thoughts.


  • Vessel Health Review

    Vessel Health Review


    I discovered Vessel Health while looking for a way to monitor my cortisol levels.  As with many of these things, I was skeptical at first, but still very eager to give it a try.  I contemplated signing up for months.  Eventually, I got a discount for a month’s supply of test cards.  I already had blood work scheduled, so I purchased a Thorne Stress test and decided to compare all three.  This gave me the perfect opportunity to try it out and see how accurate it was.


    What is it?

    The portion of the Vessel Health system that I was most interested in consists of an Android app and ‘Wellness Test Cards’.  Vessel Health also provides lifestyle and food plans in the app as well as a supplement service.

    The Wellness Test Cards are essentially an ‘at home’ urine test.  They take an innovative approach in that, rather than having to send them for analysis, they use the Vessel Health app combined with your mobile device camera to interpret your results.  You might be able to understand now where some of my skepticism stemmed from.

    In addition to cortisol, the version of the Wellness Test Cards that I used was able to test Vitamin C, Magnesium, Ketone B (BHB), Vitamin B7 (Biotin), Hydration, Ketone A (AcAc), and pH.  At this time, I was also looking for a cheaper/less invasive way of measuring ketones and also had interest in my Biotin and Magnesium levels.  Since I’ve used Vessel Health, they’ve added additional support for Calcium and Sodium.

    How do you use it?

    The app provides a very thorough walkthrough regarding how to use the Wellness Test Cards.  If you trust your aim, you could do your business right on the test card, but note that there are ‘wet’ and ‘dry’ zones that apparently will skew results if you intermix them.  I opted to use a cup and then dunk my test card for the time needed to measure the results.  Next, you allow the test card to dry and then you can snap a photo of the card from within the app.  After a few moments, you can analyze your data.  The app will then present you a number of food and lifestyle options that you can choose to incorporate in order to get your scores in a more optimal range.  The app provides a facility for tracking your progress across tests.

    Vessel Health Wellness Test Card

    How well did it work?

    The version of Vessel Health that I tried gave me a general range rather than pinpoint values that I could directly compare to my bloodwork/other tests.  I’m used to this with many of the other devices I use and don’t have a problem with comparing the relative values of regularly taken tests with the same device.  It seems that the current version is more explicit about the values, but I have not been able to test that.  In general, the results from Vessel Health were in the range of what was shown by my blood work/other tests.  It worked well enough that I was definitely interested in continuing to use Vessel Health on a regular basis… especially as the costs of the Wellness Test Cards became more affordable and/or the number of tracked biomarkers increased.  Unfortunately, this never happened as I will go into more detail below.


    What didn’t work/could be improved?

    There were a handful of things that I didn’t like about my Vessel Health experience.  Ultimately, one of these was completely out of my control and the others made me investigate other options to ultimately find better solutions.

    Android App

    Pretty much all apps in the health/bio-hacking space on Android SUCK.  As a former Android developer, this is a personal pet peeve of mine.  Many companies either don’t put out an Android app or release theirs as an afterthought.  This usually results in an app that is so buggy as to make it unusable.  Aside from the introduction piece that shows you how to use the Wellness Test Cards, Vessel’s Android experience was the same… sometimes worked, most of the time didn’t… would not maintain state, did way too much on the UI thread, etc. all of the usual issues that are made by amateur Android developers.  Once I figured out the things that you should never do in the app, I could deal with it… until I upgraded my phone and got this:

    That’s right… they’re still targeting two full generations behind the current flagship devices made by Google.  This is definitely a deal breaker for me.

    No Data Export Capability

    Regular readers know that I run all of my Quantified Self data analysis from Google Fit.  There is no Google Fit integration with Vessel Health.  Even worse, there doesn’t appear to be any way to export the data in any form.  I’ve been burned by enough crowd sourced devices from companies that disappeared overnight.  Providing a way for me to get my data, when the product is no longer supported is critical for me.  I tried to load my old data in the app while writing this review.  It appears that it’s been lost and is currently unretrievable.

    Conclusion

    Ultimately, the poor app experience is what forced me to stop using Vessel Health.  During the time that I had a phone that it worked on, while frustrating, I enjoyed the experience.  I would gladly continue to pump money into this in order to reward a company moving this technology forward.  What would it take for Vessel Health to be part of my regular testing routine? At a bare minimum, the app/data export issues need to be addressed.  I would also like to see a roadmap for any new biomarkers that might be added.  I already feel like I have my supplement and lifestyle plan dialed in, so I’m not really interested in another app/company’s take on that.  Just let me put my data in the apps that I’m already using for that type of thing.

    Have other questions?  Have you used Vessel Health? Let me know (unless you’re going to gloat about how great the iOS experience is 😒).